Synology SMBv1 Docker container workaround

  • 18 October 2020
  • 73 replies
  • 9250 views

Userlevel 3
Badge

So I've got a Synology NAS and a couple of Sonos speakers. Some day I got the stupid (!) idea to switch SMBv1 off and soon I found out that my Sonos stuff was unable to find my local music library.


Of course I agree that Sonos should move to v2 or v3, but since there is no sign they will, even after the whole S2 operation, it seems we will have to solve this ourselves.


I’ve seen the Raspberry pi solution here on the forum, but I didn’t want separate devices and I thought it should be possible to do the same with docker on the NAS itself. If you are not familiar with Docker yet: it is like running an extra machine (called “container”) on your NAS, a little bit like virtual machines, but easier and more lightweight. The container runs isolated on your NAS, it only gets the access to your NAS you grant it specifically. Docker is a standard package on Synology. It also has a nice “registry”: an app store where everyone can share their containers.


So the idea is: run a container with SMB (Samba) v1 with read-only access to the music library on the Synology NAS only.


This workaround can almost completely be done from the DSM user interface!


Unfortunately you’ll need to enter one command on the command line. This is because standard Docker networking won’t suffice. Most containers use the IP-address of the host-machine (your NAS). I assume you want to keep Samba running on your NAS to access your (other) files on Windows and only upgrade it to a higher (more secure) version. This is why standard Docker networking won’t be enough here. Your container needs it’s own IP-address. This can be done with Docker macvlan networking, but there is no way to enable that from the user interface.


How to


Step 1 – install Docker

Login to your Synology NAS web interface (DSM) – you need to be administrator

  1. Open the Package Center
  2. In the Search field, search for docker
  3. Click Install on the Docker result


Step 2 – enable macvlan networking

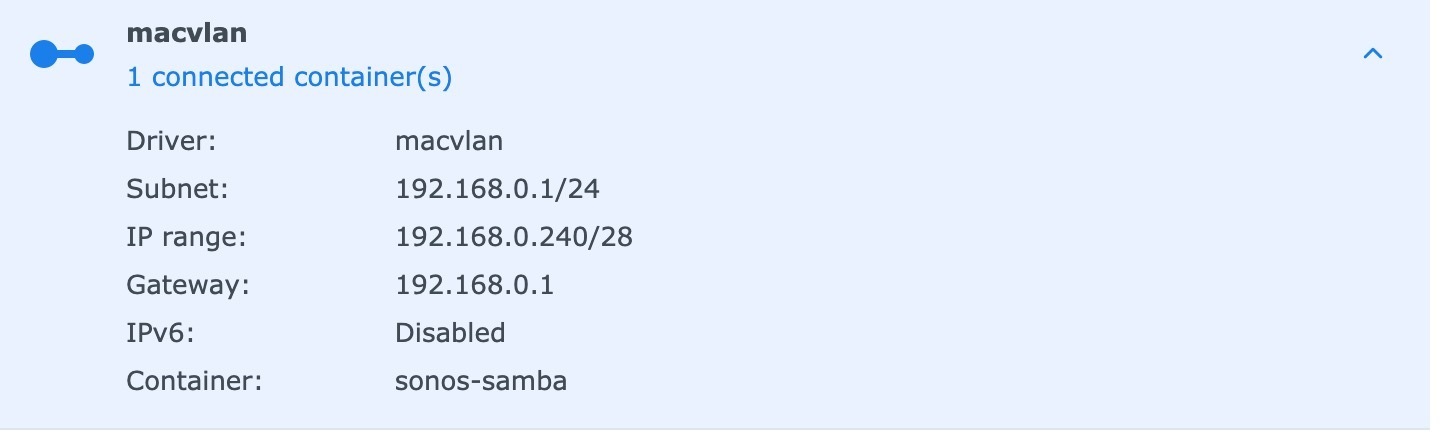
As mentioned above, Docker containers usually don’t need their own IP-address, but in this case, it does. So your NAS will be connected to your network with only one cable, but it will have 2 IP-addresses. We need macvlan networking for this. With macvlan networking, Docker will supply your container with it’s own IP-address from  a designated pool of addresses, but all IP-address need to be on the same subnet!

Example IP-addresses

Your router: 192.168.0.1
Subnet: 255.255.255.0
Your Synology NAS: 192.168.0.2


Now your router will probably automatically supply computers on the network with IP-addresses (DHCP). Docker won’t listen to your router, but does this on it’s own. Therefore, you need a small range of IP-addresses that won’t be used by your router. In my case, my router manages IP-addresses from 192.168.0.1 to 192.168.0.200. So I can use anything between 192.168.0.201 to 192.168.0.254. I decided to use the end of the range: 192.168.0.240 – 192.168.0.254 which can also be described as 192.168.0.240/28. Many routers will be save using these high numbers, but please check your router settings to be sure and check the manual of necessary. Your network will become a mess if IP-addresses are used multiple times. If you can’t use 240-254, please Google subnet calculation to find another small range you could use.


To set this up in Docker, you need to login to the command line with SSH. On windows you can do this with Putty. You might need to enable SSH to do this. Settings are on the Control Panel under Terminal & SNMP.

After login just type (or copy here and paste in Putty using right mouse-click):


sudo docker network create --driver=macvlan --gateway=192.168.0.1 --subnet=192.168.0.1/24 --ip-range=192.168.0.240/28 -o parent=eth0 macvlan


And press enter. You will need to re-enter your password after this, because you are using sudo (to run administrative tasks)


After that, some random range of numbers will be shown. You’re done! Type “exit” and confirm with enter to leave.


Go back to the userinterface (DSM) en open Docker. Click on Network to confirm your macvlan network is there.


To find out more about Docker macvlan, see:

https://docs.docker.com/network/macvlan/

https://docs.docker.com/network/network-tutorial-macvlan/

https://collabnix.com/2-minutes-to-docker-macvlan-networking-a-beginners-guide/


Step 3 – download and launch Samba container

Now it’s time to download and launch your Samba container. Fortunately, several people have created Samba containers before, so you don’t have to create one yourself.


Click on Registry and type samba. First hit will be dperson/samba. This version is by far the most common. Select it by clicking on it and then hit download. A version selector will be shown, and latest is fine, so just continue. Download will start and will be ready soon, the image is pretty small.


Now go to Image. Here you will see all the images you downloaded and are waiting to be used. As long as the storage icon is changing, download is still in progress. A notification will pop up when download is ready. Select dperson/samba:latest and hit launch.


On the next screen, give your Container a nice name, like “sonos-samba” and you may want to limit resources. 512 MB should be enough.


Go to Advanced Settings and hit Enable auto-restart if you like. This will restart the container if it – for some reason – fails.


Then go the Volume and click Add Folder. Select the folder your music is stored. In general, this will be the “music” share. Make sure not to select any folder with anything private in it. So, if you store your music in your home folder, make sure not to select /homes/, but only select the subfolder containing music.


After this, in mount path, just type /music. And make sure to hit the Read-Only button. This way Docker will grant read-only access to this share. So even if your container gets compromised, it can’t hit anything on your Synology NAS.


Next go to Network. Make sure to remove Bridge (select and hit - ) and add your newly created macvlan network.


Port Settings and Links are fine, don’t touch.


Your share settings have to be added on the Environment-tab.

Although you might add the share as a public share, I prefer to use passwords anyway. Please make sure you use a generated password that you don’t use anywhere else!


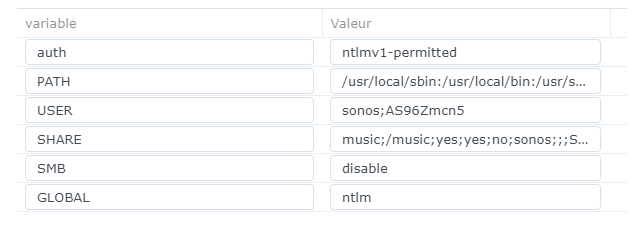
Following Environment variables have to be set:

PATH 	= leave as is.
GLOBAL = ntlm auth = ntlmv1-permitted
# this will enable old authentication mechanism, necessary for Sonos
SMB = disable
# This will enable SMBv1
SHARE = music;/music;yes;yes;no;sonos;;;SonosMusic
# This is will add a share music, located at /music (location where you mounted your local music on the Volume page), read-only accessible for user sonos with description SonosMusic.
USER = sonos;verysecretgeneratedpassword12345

If you think you may need more settings, or want to understand these, please check the webpage of this container: https://hub.docker.com/r/dperson/samba

Click Apply.

Click Next

Click Apply.

Your container will now start!


After a few seconds you will be able to go to \\192.168.0.240\ (or any other IP-address you’ve set) in the windows explorer. You will need to enter sonos as username and your verysecretgeneratedpassword12345 as password and then you will see your music share and will be able to browse through your music collection.


If this works, go to your Sonos settings and add \\192.168.0.240\music as music library. If it connects properly, it will first start indexing. It’s a sign it is working and you can now safely remove the existing share pointing directly to your Synology NAS.


Don’t forget to turn SMBv1 off on your Synology! You can find it in the Control Panel under File Services. Click Advanced under SMB and change Minimum SMB protocol tot SMB2 or higher.


73 replies

Userlevel 5
Badge +16

Hi @jelvank, thank you for sharing this with us, and welcome to the Sonos community.

We really appreciate you for providing descriptive information and the step-by-step procedure to address a similar issue. This will be helpful to our community users. Please continue sharing your experiences with us. 

Feel free to reach out to us or create a topic if you still have further questions or concerns. 

The Sonos Community is always here to help.

Userlevel 2

@jelvank Thank you so much for this - working perfectly

Userlevel 5
Badge +16

Hi @samward, thank you for your feedback and we appreciate it. I'm glad that your Sonos is working perfectly

Please feel free to reach out to us if you have questions or if you need help with your Sonos system.

We will be glad to assist you.

Userlevel 2

Hi @samward, thank you for your feedback and we appreciate it. I'm glad that your Sonos is working perfectly

Please feel free to reach out to us if you have questions or if you need help with your Sonos system.

We will be glad to assist you.

@Rowena B. Just to clarify, I was able to get my Sonos to talk to my NAS by creating a separate server using outdated and insecure protocols.  Sonos MUST fix their SMB protocol - users should not have to go to these lengths just to listen to their own music.

Very interesting - many thanks...

Userlevel 7
Badge +23

@Rowena B.Just to clarify, I was able to get my Sonos to talk to my NAS by creating a separate server using outdated and insecure protocols.  Sonos MUST fix their SMB protocol - users should not have to go to these lengths just to listen to their own music.

Just use a PC or a Mac to host your files: no SMB required.

Using Plex as a Sonos SMBv1 Workaround
I have a WD My Cloud PR2100. I’ve always hated using SMBv1 to run my music library on Sonos from the PR2100. I’ve kept the NAS off the internet to provide some security but that’s not ideal. WD recently updated their OS (OS 5) allowing SMB2&3 or SMB3 only, but I still have to set in on SMB1,2,3 and use NTLMV1 to run a Sonos music library from the NAS. NOT SECURE.
I’ve also seen the Raspberry Pi solution on this and other community discussions but didn’t really want a separate device. So, I thought I’d try to mount my music folder in a Docker container running SMB1, as suggested by the OP on this post. I got the macvlan network running and was able to see the mount in the dperson/samba container from Windows 10 or Mac OS but the folder was always empty no matter what I tried. Maybe a permissions problem or something else. I don’t know Docker or Linux at all, so it was a learning experience for me.
Then, I realized that Plex might work. Plex doesn’t require SMB1 and serves as a media server for music. Importantly, you can set up Plex as a service on the Sonos App. You don’t need Plex Pass for this to work, so it’s free. One draw back is you need to open a port on your router and enable Plex Remote Access for this to work. I think this is an acceptable security risk because :

  1. Plex apps support secure connections with SSL secure certificates
  2. I did not have to turn on UPnP on my router to enable Remote Access in Plex, which would create security issues. Instead, I used manual port forwarding on my router.

On my router, I mapped a WAN/External Port (TCP) number I chose and the external (public) IP address to a LAN/Internal Port 32400 (TCP) and my NAS’s IP address (needed to set static IP address for NAS on router so IP address doesn’t change). Plex has good instructions on their web site for enabling Remote Access with manual port forwarding in the Plex Media Server. Seems like a reasonably secure set up. Certainly better than leaving SMB1 active!
I already had the Plex Media Server (App) running on my NAS to stream movies from the NAS. I loaded my music folder into Music Library on the Plex Media Server and enabled Remote Access with the WLAN port I chose as per the instructions on the Plex web site. After some wonky behavior where I had to hit “enable” and “retry” twice, Remote Access was “fully enabled”.
After this, I added the Plex service on the Sonos App and logged into my Plex account. Once logged in I could see and play my music that I loaded to Plex earlier. Next I turned off SMB1 on my NAS and all my music was still available through Plex on the Sonos App. Also, searching in the Sonos App finds my music in Plex service like any other service in the app.
So, using Plex, my local music library on my NAS is streamed to Sonos using the Sonos App without running SMB1! I’ve had this running for only a day, so don’t know how stable the set up is. Don’t expect any problems though.

Userlevel 7
Badge +22

Good news, I like any SMB v1 solution that does not involve running SMB v1 on your NAS that has important data on it.

Badge

Hello
Very interesting post.
Connection to a Synology NAS with DSM 7 ist not possible anymore.

I was just wondering: is the SAMBA solution with Docker 100 % secure?

Thanks.

Badge

Is there a possibility to configure the samba container in a way that it broadcasts a friendly name instead of accessing it via the ip address?

Userlevel 7
Badge +22

Add the IP / name translation to your router’s DNS settings if nothing else.


sudo docker network create --driver=macvlan --gateway=192.168.0.1 --subnet=192.168.0.1/24 --ip-range=192.168.0.240/28 -o parent=eth0 macvlan


Jelvank just wanted to write and say THANKYOU. This is a brilliant solution and seems to work flawlessly. Even someone who shouldn't be trusted with a command line like me can follow it!

Only thing I had to change for mine was because my synology uses a Bond (2 ethernet ports in 802.1ad).  I changed eth0 to bond0 in the above and it worked fine

Thankyou so much for going to all this effort to make it clear and easy to follow.

Thanks for tutorial. I can’t connect to my share. Something with environment variables I think.

My routeur address is 192.168.10.1 so I’ve modified the local dhcp range.

Could you help me ?


Found the solution ! Issue was on GLOBAL variable

Badge

I followed this (substituting my subnet of 192.168.1.1), and was able to connect to the share with my PC and sure enough the folder ‘music’ was there, but when I tried to add a Sonos library I get the error “Unable to add the shared folder “//192.168.1.240/music/” to your Music Library (900)

Badge

Ignore my above comment, finally got it working. I hadn’t added the “SMB - disabled” environment variable.

Badge +1

I'm stuck. I am a complete noob when it comes to command line. I have never done it on my new Synology DS920+ or previously my old DS412+. I am trying do the Sonos workaround and I just can't figure it out.

How do I know what IP address the Docker uses my IP range is 10.220.30.xxx, so I can point Sonos to it, plus I have 2 folders with music.

1. is Music and 2. HD Music AIFF. I tried to do share 
SHARE = music;/music;yes;yes;no;sonos;;;SonosMusic and SHARE = music;/HD Music AIFF;yes;yes;no;sonos;;;SonosMusic


Docker didn’t like the 2 shares so I did SHARE = music;/HD Music AIFF/music;yes;yes;no;sonos;;;SonosMusic


Like I said, I’m a complete noob at this! 

Hi

Working on this now.  Hopefully works in my environment.

Can you have this work when utilising a custom domain?  Say I have a domain specialdomain.dyndns.org.  I have another Sonos system at work, and I would love to be able to have the music library pointing to specialdomain.dyndns.org/music so I can access this share from externally.   What port to open to access this??

Thanks

Andrew

Userlevel 3
Badge

Hi

Working on this now.  Hopefully works in my environment.

Can you have this work when utilising a custom domain?  Say I have a domain specialdomain.dyndns.org.  I have another Sonos system at work, and I would love to be able to have the music library pointing to specialdomain.dyndns.org/music so I can access this share from externally.   What port to open to access this??

Thanks

Andrew


I seriously advise you not to do this! You will have to expose your share to the outside world to get this to work. I would never expose a samba share to the outside world and especially not if it is SMBv1, known for its serious security issues.

Userlevel 3
Badge

I'm stuck. I am a complete noob when it comes to command line. I have never done it on my new Synology DS920+ or previously my old DS412+. I am trying do the Sonos workaround and I just can't figure it out.

How do I know what IP address the Docker uses my IP range is 10.220.30.xxx, so I can point Sonos to it, plus I have 2 folders with music.

Please refer to step 2 in the description. You will need to replace:

sudo docker network create --driver=macvlan --gateway=192.168.0.1 --subnet=192.168.0.1/24 --ip-range=192.168.0.240/28 -o parent=eth0 macvlan

with ip-adresses matching your situation. I have to guess that:

Your router = 10.220.30.1?

And your subnet is on anything between 10.220.30.1 - 10.220.30.254?

And that address 10.220.30.240 is free?

If so, your command will be:

sudo docker network create --driver=macvlan --gateway=10.220.30.1 --subnet=10.220.30.1/24 --ip-range=10.220.30.240/28 -o parent=eth0 macvlan

And the ip of your docker/samba machine will be 10.220.30.240


Userlevel 3
Badge

1. is Music and 2. HD Music AIFF. I tried to do share SHARE = music;/music;yes;yes;no;sonos;;;SonosMusic and SHARE = music;/HD Music AIFF;yes;yes;no;sonos;;;SonosMusic


Docker didn’t like the 2 shares so I did SHARE = music;/HD Music AIFF/music;yes;yes;no;sonos;;;SonosMusic


Like I said, I’m a complete noob at this! 

  1. You can't add 2 folders under the same name. Add the music folder with the name music and the other with (for example) hdmusicaiff.
  2. Make sure to add both folders in the Volume tab in your docker settings (refer to step 3 in manual above)
  3. Start trying to get it to work on share music alone. This is the easy one.
  4. You can easily see if it works by connecting to the share from Windows explorer. Go to \\10.220.30.240 and if it works, you should see the shared folders.
  5. For HD Music AIFF: I guess the command doesnt like spaces in the directory name. It probably works by escaping spaces with “\”: SHARE = hdmusicaiff;/HD\ Music\ AIFF/music;yes;yes;no;sonos;;;SonosMusic
  6. If you get both shares to work separatly, please refer to https://hub.docker.com/r/dperson/samba to see how to add more shares. Under Configuration NOTE2, it says you should be able to do so by adding SHARE2 =

Hi 

When starting the container with the settings above, I get an error:

Start container sonos-samba failed: {"message":"failed to create the macvlan port: device or resource busy"}.

I followed the information and SSH information in your post.


Thanks

Andrew


Hi


The macvlan network seems to have been created:


Thanks


Andrew

Dear @Rowena B. ,

now that DSM7 is officially launched, i assume more and more people are getting stucked with SONOS SMB1 implementation. I think the solution that has been presented here is technically very good, but not what i expect to do, if i am working with one of the leaders in multiroom entertainment.

So i (and i think the most of your users) would really appreciate any information on when SONOS will update the software and go with  SMB2.

Userlevel 3
Badge

Hi 

When starting the container with the settings above, I get an error:

Start container sonos-samba failed: {"message":"failed to create the macvlan port: device or resource busy"}.

I followed the information and SSH information in your post.


Thanks

Andrew


Could be a lot of things. I know about an issue with macvlan and Synology Vswitch:

https://www.reddit.com/r/homelab/comments/cng2s2/issue_with_synology_vswitch_and_docker_macvlan/

If you use vSwitch you might need to switch it off.

vSwitch is off unfortunately.

Reply