
press250
Prodigy III
May 6, 2024

Adding a Windows SMB Share, Step-by-Step

  • May 6, 2024
  • 44 replies
  • 20965 views

For those who have been using the Sonos proprietary(ish) file sharing built into the about-to-be-deprecated Windows desktop client (SonosLibraryShare.exe), here are the steps to enable Windows 11 ‘native’ SMB file sharing (applies to Windows 10 with some nomenclature differences). Godspeed to all.

If you’re running an up-to-date version of Windows 10 or 11, you’ll automagically get SMBv2 which is forward-compatible with Sonos. (SMBv1 and SMBv2 discussed at length elsewhere in these forums).


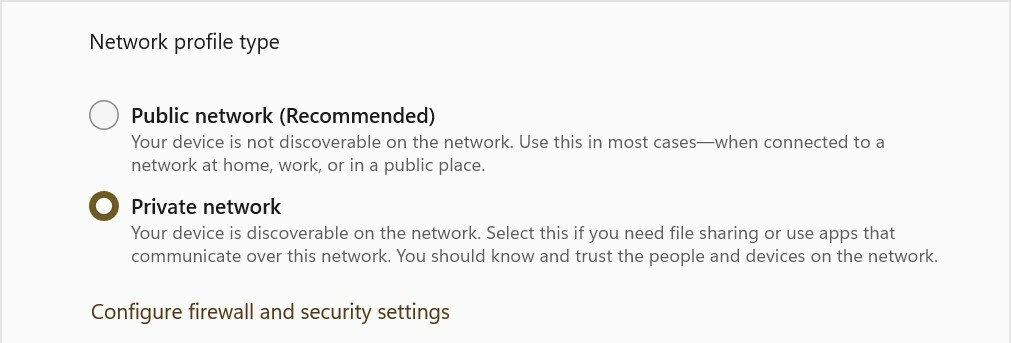
1. Switch your LAN to “Private Network”
Settings > Network & internet > Ethernet/WiFi
- Select “Private Network” radio button

2. Enable file sharing
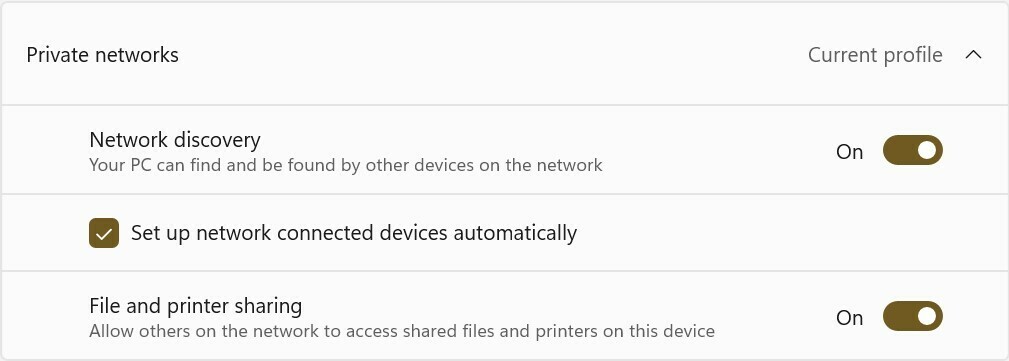
Settings > Network & internet > Advanced sharing settings
- Under “Private networks” (current profile) section
    - Set “Network discovery” On
    - Set “Setup network connected devices automatically” checked
    - Set “File and printer sharing” On

3. Setup local account specifically for music file sharing
Oh man, I can’t tackle the whole “local account” gauntlet here, so you’ll need to Google/ChatGPT it yourself. This step might not be strictly required, tho’ it is highly recommended from a security standpoint. I’m going to name this user ‘MusicShare’.

4. Share your music folder (or drive)
- Right-click on your music folder (or drive) and select Properties from the pop-up
    - Select the “Sharing” tab, and click the “Advanced Sharing” button
    - Check the “Share this folder” checkbox
    - Set “Share name” to ‘SonosLibrary’ (no quotes)
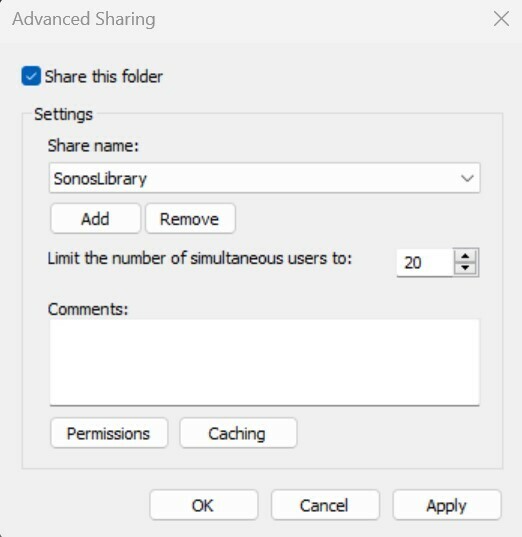

    - Click the “Permissions” button
    - In the pop-up under “Enter the object names to select” type ‘MusicShare’ (no quotes)
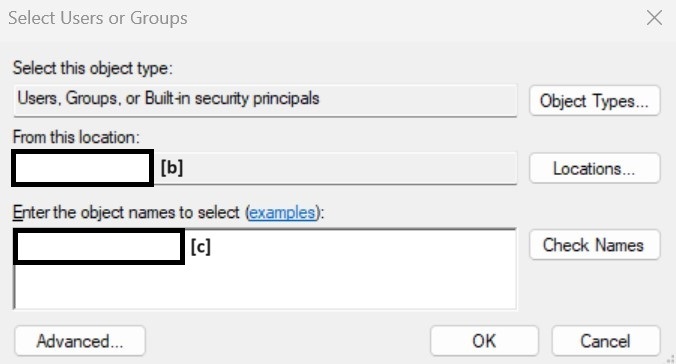
 

[b] auto-populates your machine name, [c] type ‘MusicShare’ here


- click the “Check names” button to validate, and click the “OK” and/or “Apply” buttons to close the nest dialog boxes
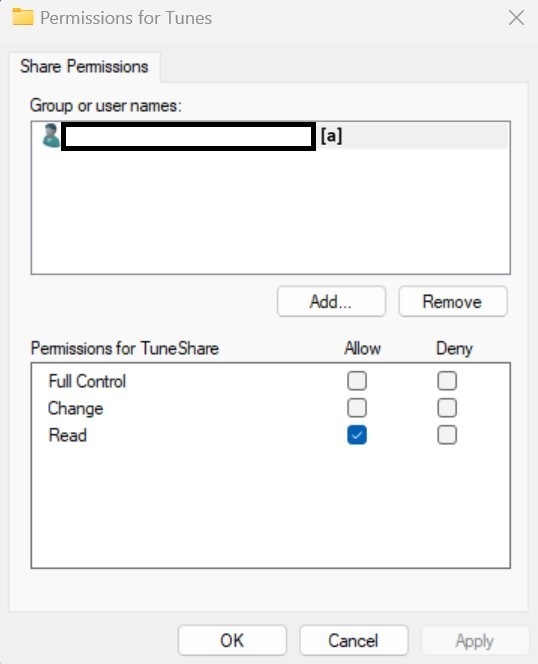
[a] auto-populates the full share name


5. Sonos Music Library Setup
- In the Sonos iOS or Android client, navigate to “Music Library Setup”
- Select “Add Shared Music Folder”
- Path = \\[your machine name]\SonosLibrary
- User name = MusicShare
- Password = [from Step 3]
- Cross your fingers (seriously) and wait for Music Index to build

This topic has been closed for further comments. You can use the search bar to find a similar topic, or create a new one by clicking Create Topic at the top of the page.

44 replies

Jamie A
Sonos Staff
May 7, 2024

Hi @press250,

Thanks for sharing this detailed guide on adding a Windows share, I hope it will help users who need guidance on setting one up for the first time. 

Regarding your first point, the desktop app will remain from the time being. You can still use it to add shares with that functionality being added to the new web app in a future update, mentioned in this thread:

I hope this information helps and thanks again for providing these detailed steps.

Local Superstar
May 15, 2024

@press250 


Step 5 - Music Library Setup. is nowhere to be found in android app.   Can't enter any details anywhere 🤔


(Latest app update) 

It's the courageous bee's knees - all 6 🐝🐝🐝🐝🐝🐝. - - - - - Make Sonos Great Again - - - - -
Enthusiast II
May 15, 2024

What about Mac? 

CronoCX
Enthusiast II
May 16, 2024

What about Mac? 

Are you connecting or Sharing out? In my experience, macOS typically just does the best available. If you wanna know what your current SMB connections are, you can open Terminal and run this command. It will show you all your networked drives and which version of SMB their using. Personally, all mine are SMB 3.1.1.

smbutil statshares -a
Enthusiast II
May 16, 2024

What about Mac? 

Are you connecting or Sharing out? In my experience, macOS typically just does the best available. If you wanna know what your current SMB connections are, you can open Terminal and run this command. It will show you all your networked drives and which version of SMB their using. Personally, all mine are SMB 3.1.1.

smbutil statshares -a

I have SBM set for sharing, Mac shows it’s sharing. No other device has issue with sharing except for Sonos. It started when they did the upgrade. They killed the share link. 

Contributor I
May 18, 2024

I try everything you said and i obtain the message Access to the shared folder XXXXXX\SonosLibrary is denied. I even put MusicShare as an administrator.

So f****** conplicated. 

I'm really  thinking to getting rid of Sonos.

So good sound but an as***** application.


Moderator Note: Modified in accordance with the Community Code of Conduct.

Lyricist I
May 18, 2024

I followed all these steps, but as someone else pointed out, Step 5 - Music Library Setup. is nowhere to be found in android app. 


I’ve p******* away hours troubleshooting this nonsense today. My system is only 4 years old and costs me thousands for around 15 now useless speakers. I don’t want f****** Spotify. Had I known I’d deal with this s***, I’d have had Bose speakers hardwired into the walls when the house was under construction before the sheet rock went up. 

Moderator Note: Modified in accordance with the Community Code of Conduct.

Lyricist I
May 18, 2024

How in the world is it alright for Sonos to tell me my systems are out of date and expect me to pay up for upgrades to my pc I don't need?

I cannot access my music library anymore. '’Access denied'’ when selecting any song…

I can't even find the folders to change these settings. Why does this have to be so complicated?

Lyricist I
May 19, 2024

Bonjour, j’ai résolu mon problème en changeant ce paramètre dans mon NAS Synology 


Lyricist III
May 25, 2024

Bonjour,

Comme d’autres utilisateur de Sonos, j’ai eu le message suivant :

Sonos n’a pas pu ajouter le dossier musical.

Raison : Impossible d’ajouter le dossier partagé //DESKTOP-EOS7G7H/Music a votre bibliothèque musical (913).

Après réflexion j’ai trouvé une solution au problème qui apparemment à fonctionner.

Voici l’explication : Clic droit sur le dossier Music et cliquer sur PROPRIÉTÉS en bas du menu.

Cliquer sur l’onglet PARTAGE et ensuite cliquer sur le premier bouton PARTAGE…

Une nouvelle fenêtre s’ouvre et vous cliquer sur le bouton V à côté du bouton AJOUTER.

Cliquer sur SYSTÈME WI-FI SANS FIL SONOS ensuite cliquer sur le bouton AJOUTER et pour finir cliquer sur PARTAGER.

Ouvrir votre application Sonos sur votre PC et ajouter votre bibliothèque musical.

Cela fonctionne à merveille chez moi et je vous souhaite le même succès.