James L.
Retired Community Staff
March 3, 2021
Tutorial

Using Sonos as PC Speakers
  • March 3, 2021
  • 135 replies
  • 349373 views
Using Sonos as PC Speakers

Moderator note: This article was updated in December 2024 to account for new products.


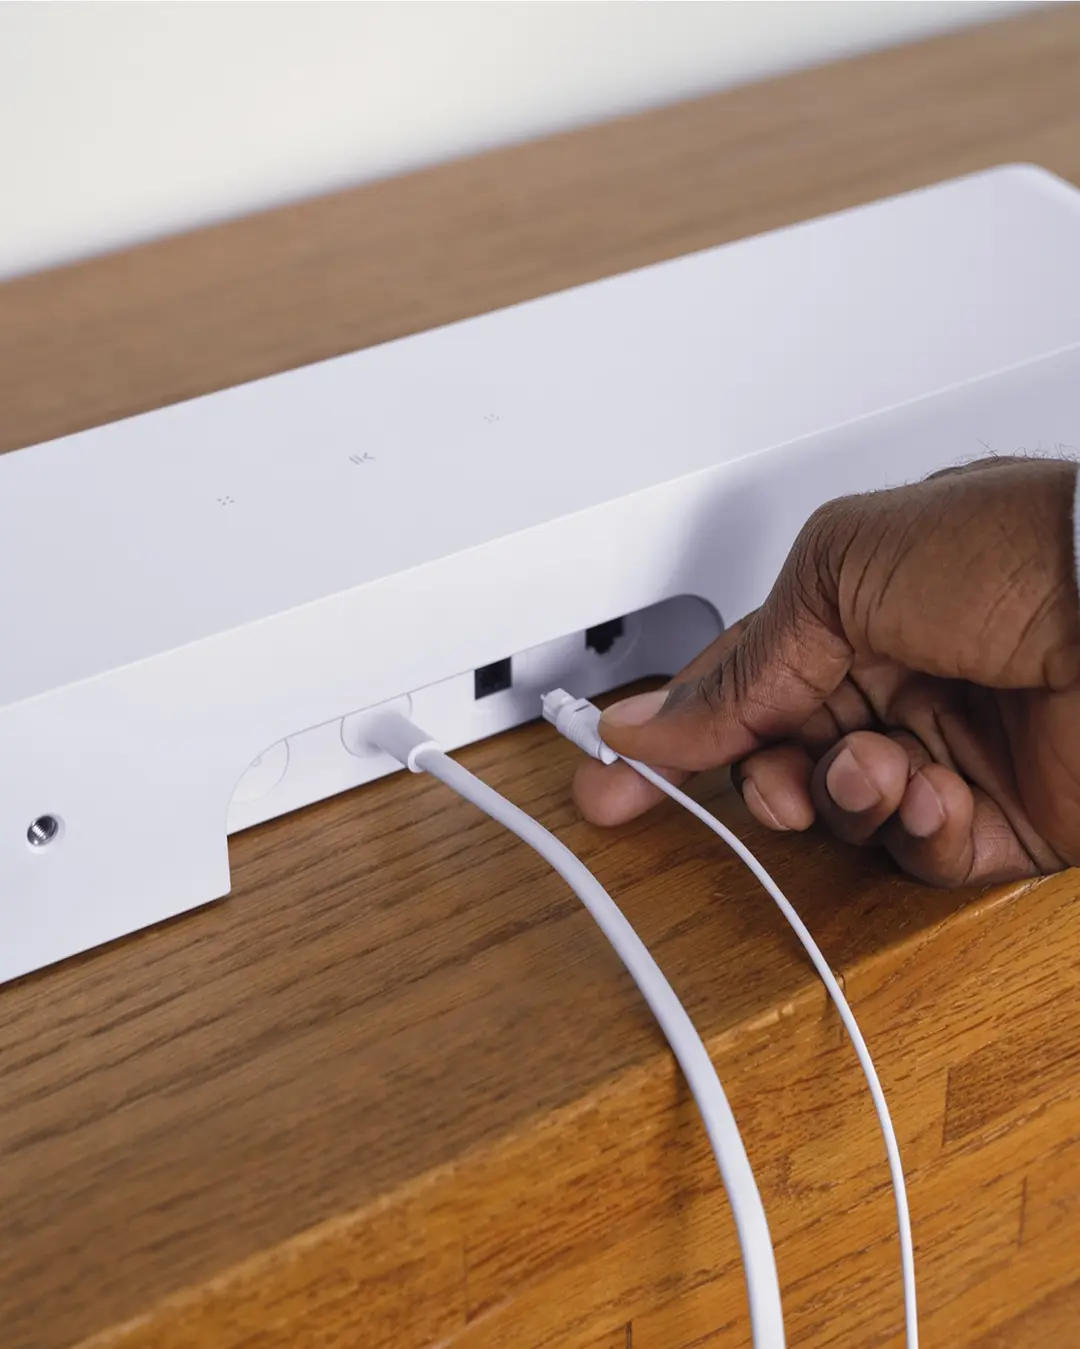
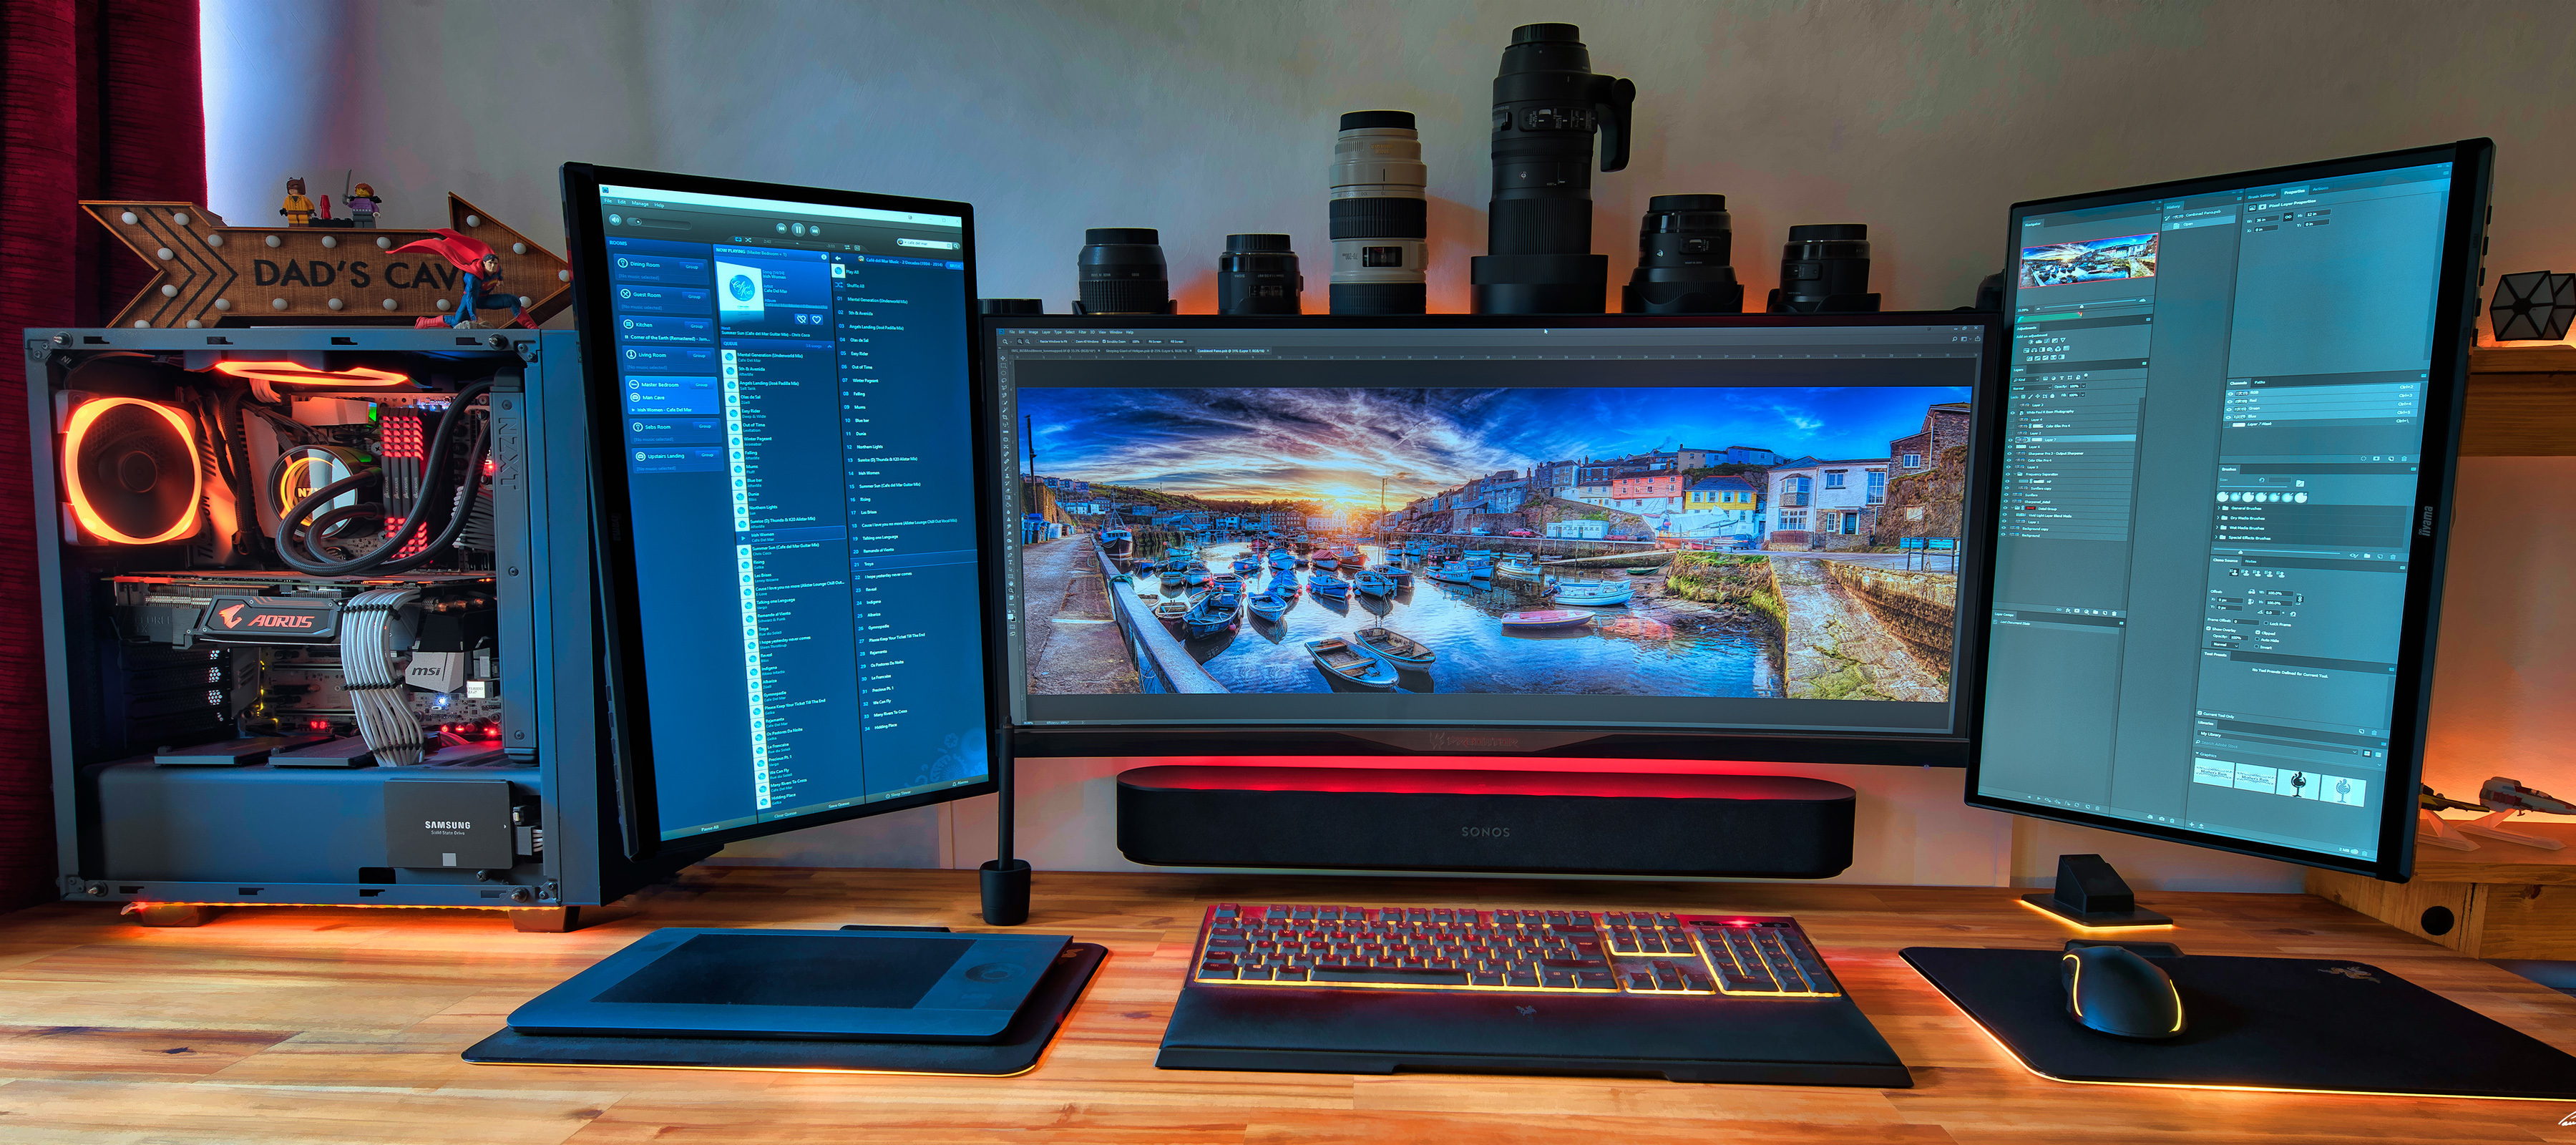
Image provided by PaulRBoon in this thread: Beam as computer speaker


At Sonos, we don’t make speakers specifically designed for your computer. However, if you are considering integrating your computer sound into your Sonos system, we want to help you get the most out of your products. With this being said, not all computers are built equal, so your mileage may vary, therefore it’s unfortunately not something Sonos can help or support you with setting up outside the general advice here.

In this article, we are going to be focusing on the best ways to get your computer audio coming through a Sonos Playbar, Playbase, Ray, Beam, Arc & Arc Ultra, Amp, Move & Move 2, Roam & Roam 2, Era 100 & Era 300. To get this to work, there are two things to look at: how to connect the products and the settings needed.


A quick note on Play:5, Five, Connect:Amp, Amp, Port, Connect, Era 100 & Era 300

While it is possible to use these players with a PC by connecting to their line-in ports (Era models will need the USB-C adaptor), this isn’t a recommended solution if you’re planning on doing something that requires audio/video synchronization. There will be a minimum of a 75ms delay on the audio due to the signal processing performed on the line-in side. If synchronization isn’t an issue for you, you can simply connect the device to your PCs headphone or line out jack like you would a pair of regular headphones.

Move, Move 2, Roam, Roam 2 & Era 100/300

Bluetooth links via these models will experience the same delay, as Bluetooth acts as a virtual line-in and also needs buffered for network play.


Connecting: 


Depending on the product you’re trying to connect, the method of connecting it to your computer will be slightly different. I’ll group the products with similar connections together to make things a bit easier to follow.


Playbar, Playbase & Ray

These products use a TOSLINK/Optical cable to receive audio, so if you’re looking to use these as PC speakers, your PC must be equipped with an Optical Out port. Most PCs don’t come with these built into the motherboard, though some higher end ones do. In most cases, you’ll likely need to use an internal sound card to provide that connection. Simply use an Optical cable to link your Playbar/Playbase/Ray to the Optical out port on your computer; just like you would to hook it up to a TV.
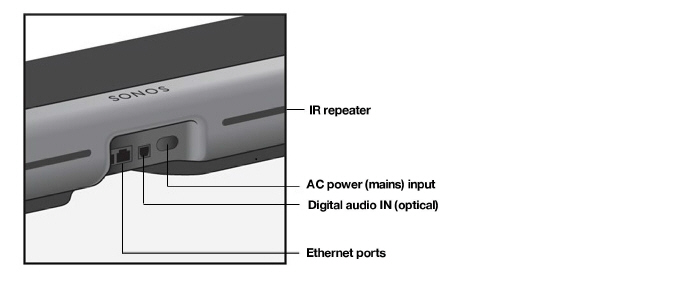
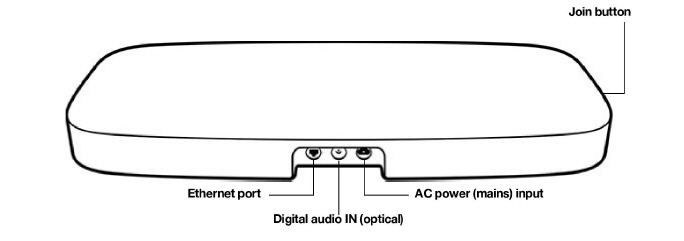
Playbar - use the Digital audio IN port
Playbase - use the Digital audio IN port
Ray - use the Digital audio IN port

Beam, Arc, Arc Ultra & Amp

If you’re using a Beam, Arc, Arc Ultra or Amp as computer speakers, there’s one extra step. You’ll need to make use of the Sonos Optical Audio Adapter that is included with your product (excluding Amp). Most computers send a regular HDMI audio stream over their HDMI ports, whereas these products require an HDMI-ARC audio signal. These are not the same. Unless you are using a TV equipped with HDMI-ARC as your monitor, connecting via HDMI-ARC won’t be possible. If that does apply to you, you can check this FAQ to find out how to set up your Beam, Arc or Amp.
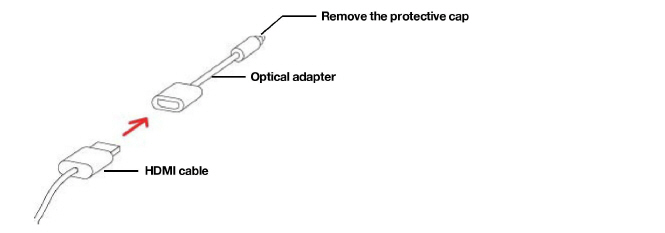
How to use the Sonos Optical Audio Adapter


With Amp, you also have the option to use the RCA Line-In ports, though you should be aware that there will be a minimum of 75ms delay due to the signal processing performed on this input. Therefore, it’s generally a better experience to use the HDMI ARC port with the optical adapter.
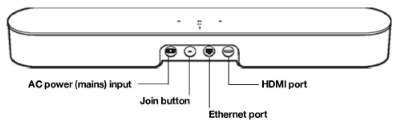
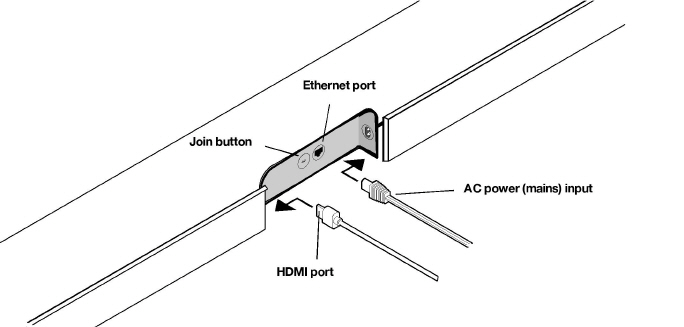
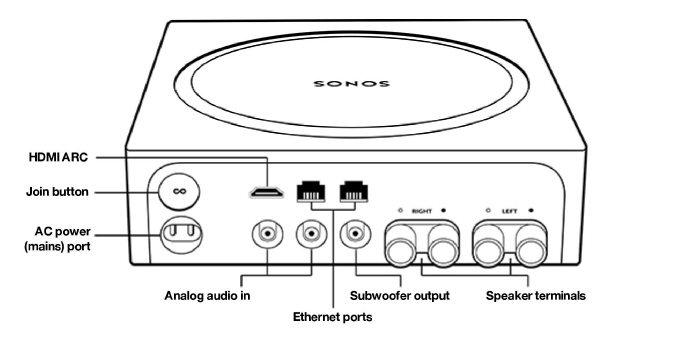
 

Beam - use the HDMI port with the Optical adapter
Arc & Arc Ultra - use the HDMI port with the Optical adapter
Amp - use either HDMI or Analog audio in connections


Move, Move 2, Roam & Roam 2, Era 100 & Era 300 (Bluetooth)

With Moves, Roam and Eras, things are a lot more simple. Hooking up these products is as easy as switching them over to Bluetooth mode, opening the Bluetooth settings of your PC and selecting them from the list, just like you would to connect a mobile device. We’ll show you how to do this in the next section.
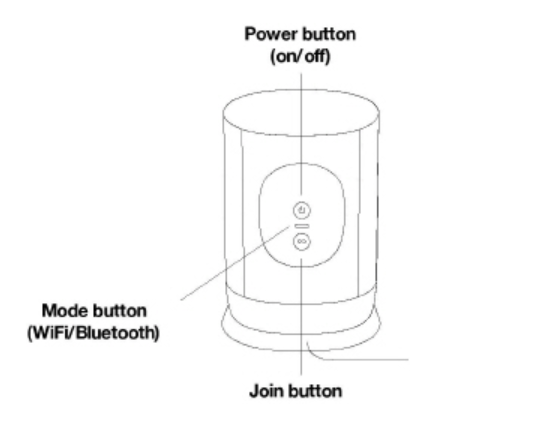
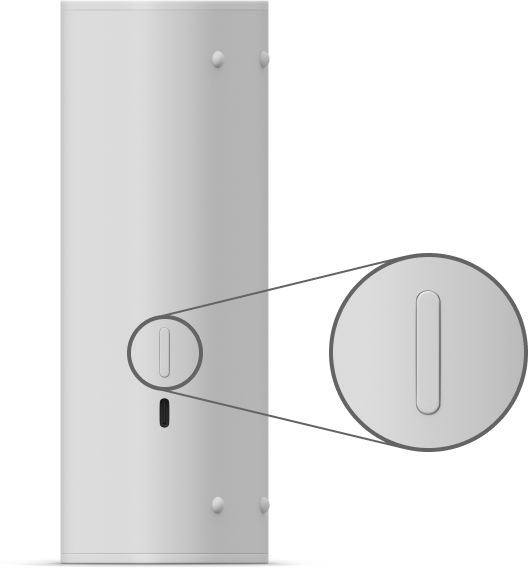
Move & Move 2 - push the Mode button to switch to Bluetooth
Roam & Roam 2 - push and hold the power button for 2 seconds to switch to Bluetooth
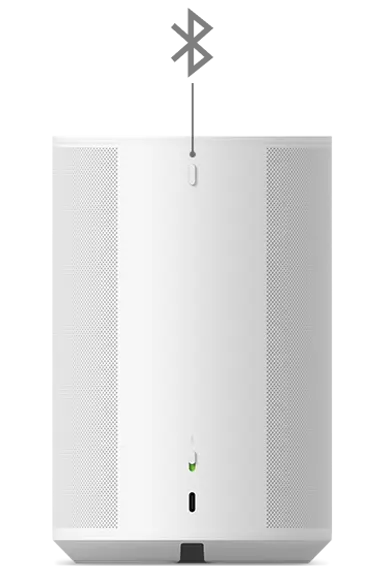
Era 100 - hold the Bluetooth button until you hear a chime to pair​​​​


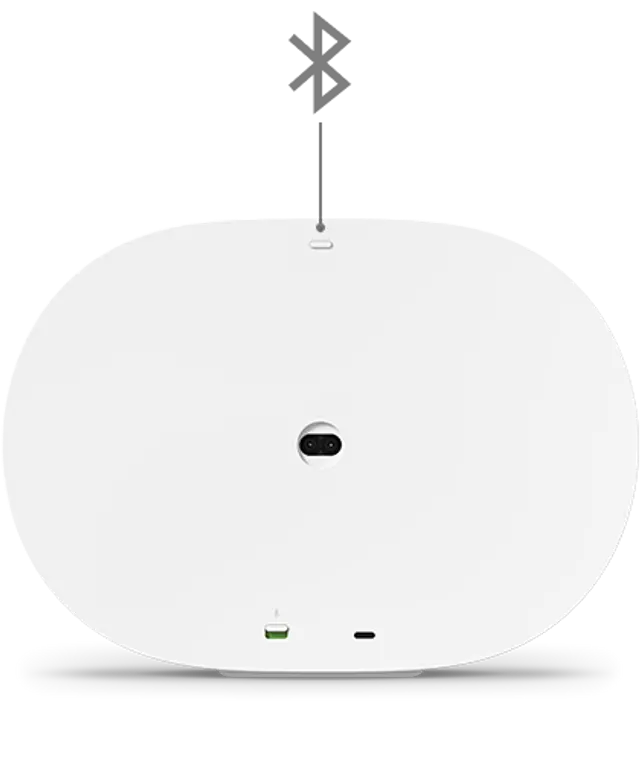
Era 300 - hold the Bluetooth button until you hear a chime to pair

Note that you only need pair a Sonos device to your PC once - from then on, you can use the computer to reinstate the link. 


Settings:
 

Connecting via optical cable or Sonos Optical Audio Adapter


Once you are connected with an optical cable, you may need to perform some steps to get everything running smoothly. It would be almost impossible for us to list specific settings for every sound card or motherboard that has an optical port built in, but we can provide some basic recommendations.


Once the optical cable is plugged in, click the speaker icon in the bottom-right corner of your Windows taskbar, then click the speaker name above the volume slider to see if an “Optical” or “Digital” sound output has shown up. If it has, just click to enable it. 
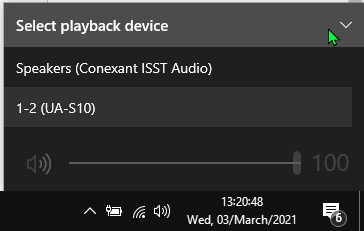
Look in this drop-down list for “Optical” or “Digital” sound output

If the speaker doesn’t show up there, right-click the speaker icon in the taskbar, click Open Sound Settings, Sound Control Panel and then the Playback tab.

Right-click anywhere in the list, then click “Show Disabled Devices.”
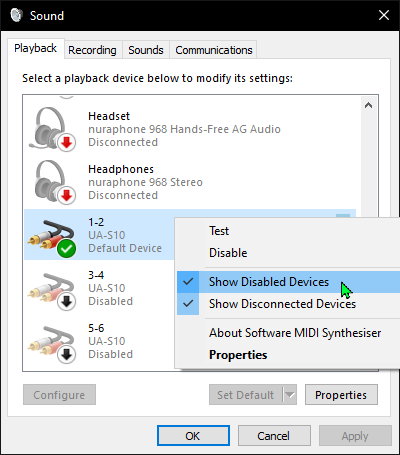
 

Make sure “Show Disabled Devices” is checked


Once you’ve done that, a device named “digital output” or “optical output” should show up. Right-click it and click “Enable” to switch it on. Once you’ve done that, right-click it again and click “Set as default device.” You should now have optical audio enabled and be able to listen to your PC audio through your Sonos player. You may need to open your Sonos app and select TV from the browse menu if TV Autoplay isn’t enabled.

If this doesn’t work for you, double-check the cable is properly seated in the optical port (it should have a gentle bump or click when fully inserted), and make sure the latest drivers are installed for your sound card or motherboard’s audio processor. If all this checks out, but you’re still not seeing the options show up, get in touch with the manufacturer of your device for further assistance.


Connecting through Bluetooth


Connecting to Moves, Roam or Eras through Bluetooth is relatively quick and easy. Take a look at the GIF below to see how it’s done in Windows 10. Note: not all desktop PCs have Bluetooth built in, so you may need to use an external adapter/dongle.
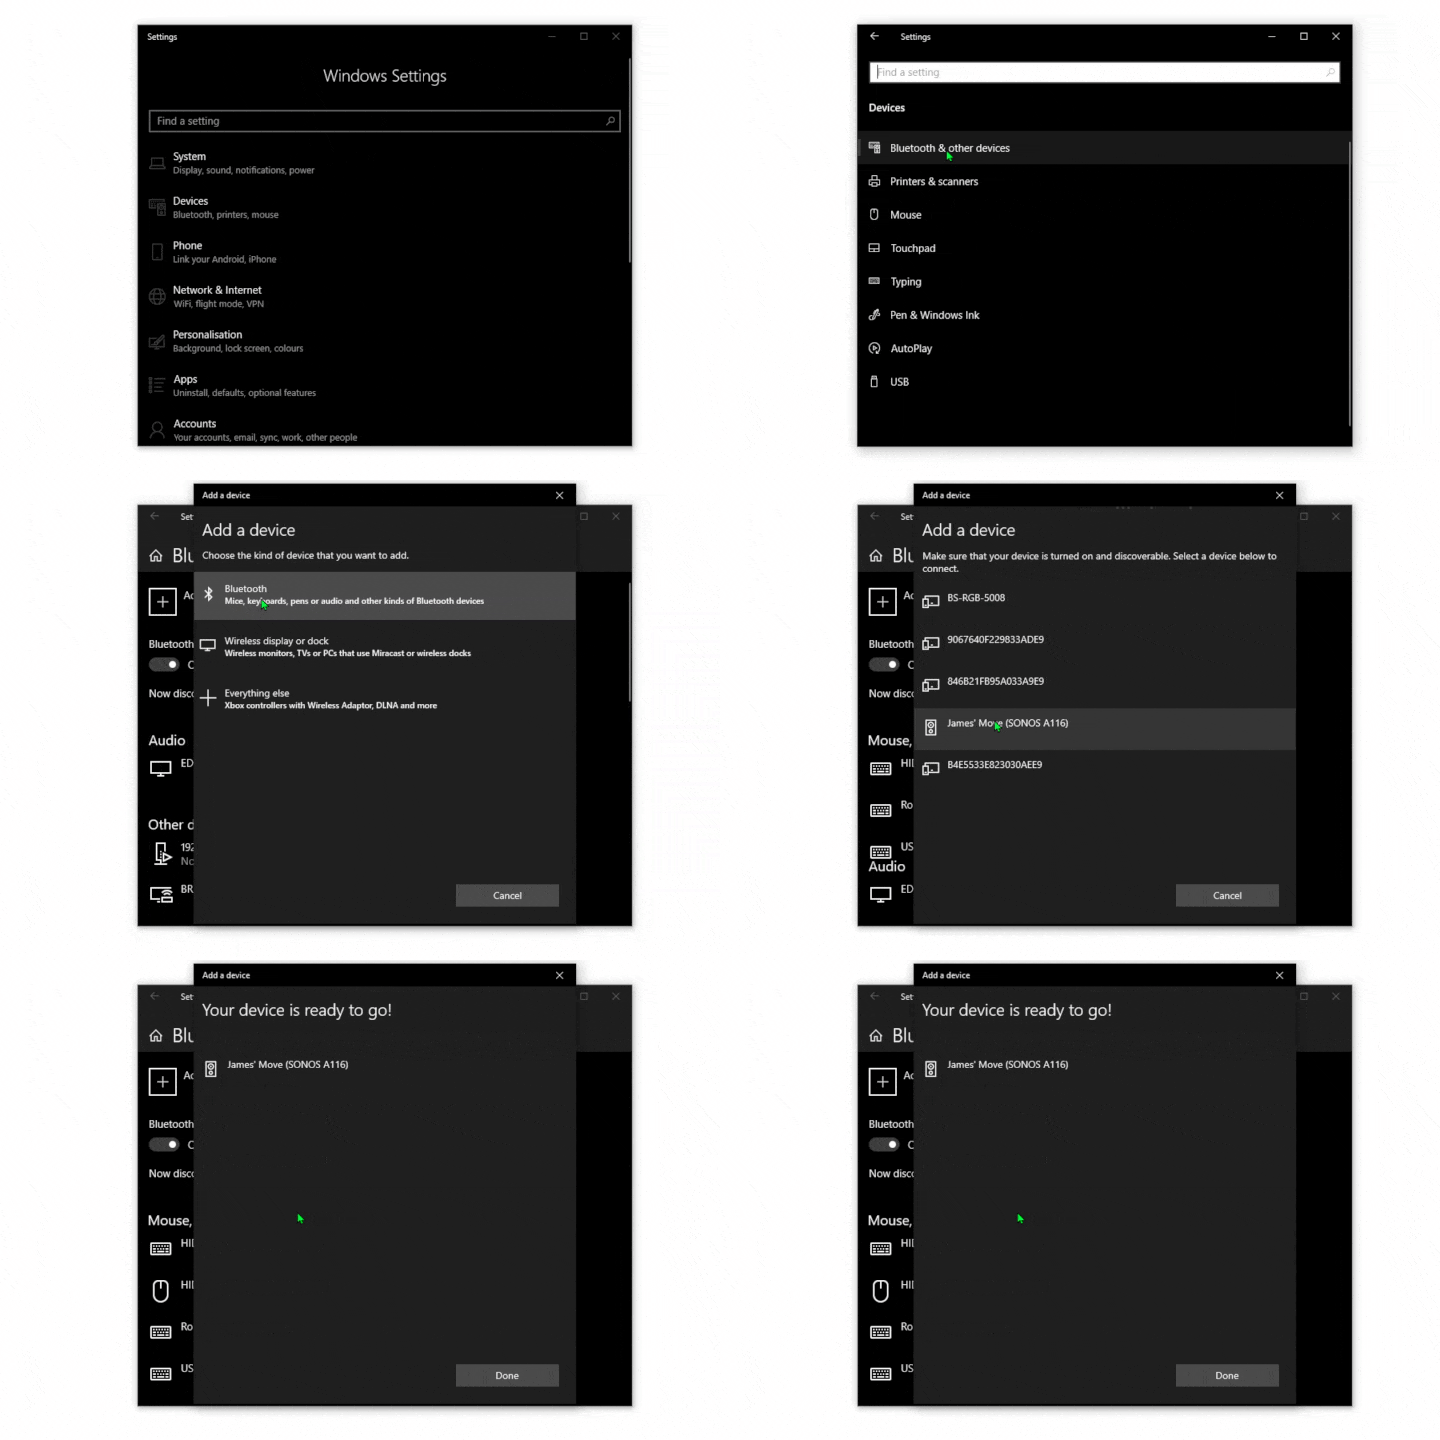
On Mac, the process is also fairly straightforward. You can use the same method for connecting to Sonos through Bluetooth, or you can establish an Airplay stream to any Airplay 2 capable speakers. Check out our FAQ on Streaming Airplay audio to Sonos.


And that’s it! Once you’re connected in either of these ways you’ll be able to enjoy your PC’s audio on your Sonos player. If you’re using the cabled method you’ll be able to group other wireless players in with your PC connected device and have that audio all around your home, just be aware that the players treat the incoming signal as TV audio, so a strong connection is required between players in order to enjoy uninterrupted sound on a large group.

We love to see what our users do with our products, so if you have your Sonos set up in an interesting way with your computer we’d love to see it! Feel free to post your images in this thread :smile:

This topic has been closed for further comments. You can use the search bar to find a similar topic, or create a new one by clicking Create Topic at the top of the page.

135 replies

Lyricist II
June 27, 2023

@John B thanks for the quick response!  I guess I’m not following the 3.5mm → RCA → Adaptor → Standard optical cable → Ray.

No way to skip the RCA bit? feel like I need another adaptor for 3.5mm to RCA.

What other draw backs are there with the adaptor?

  • Stereo only
  • volume control

I guess I’m just trying to understand which features I’m foregoing using an adaptor vs. sound card.  Any expert opinion here would be much appreciated.


Lyricist II
June 27, 2023

I have this old sound card with a S/PDIF optical adaptor, do you think it would still be Stereo only?

June 28, 2023

@John B thanks for the quick response!  I guess I’m not following the 3.5mm → RCA → Adaptor → Standard optical cable → Ray.

No way to skip the RCA bit? feel like I need another adaptor for 3.5mm to RCA.


The adapter you linked  has an RCA input and your computer has a 3.5mm jack output.  So you need a cable with a 3.5mm jack at one end and an RCA connector at the other.  There is no adaptation or conversion involved here.  How else are you going to connect the two devices?

What other draw backs are there with the adaptor?

  • Stereo only
  • volume control

I guess I’m just trying to understand which features I’m foregoing using an adaptor vs. sound card.  Any expert opinion here would be much appreciated.


You aren’t foregoing anything by using the adapter.  You are losing multichannel sound because you are using an output connection that is only capable of handling stereo.


Lyricist II
June 28, 2023

Ah makes sense.  I decided to get an optical soundcard, the ASUS Sonar SE.  Let’s hope this works.


I tried plugging in my old ASUS Sonar DX, it has a SPDIF out.  I used a 1 x S/PDIF Header and it doesn’t work :(

Contributor I
July 26, 2023

Hello!

In a setup with Bean Gen 2 + Sub + Amp with 2 in-ceiling connected with the optical cable to a Mac Studio, would we be able to get 5.1? Or would this just be stereo?


I’d like to be able to play games or watch movies with surrounds from the Mac Studio but I’m not sure if the optical adapter will be detected by MacOS as a multi-channel output or just 2 channel stereo.


Thanks!

Corry P
Sonos Staff
July 26, 2023

Hi @Gutemberg Ribeiro 

Using an optical connection, you should be able to receive Dolby Digital 5.1 (not DD+) or DTS 5.1, assuming your Apple TV is willing to output those formats - I assume you’ll need to specify the output format manually.

I have no experience playing games on Apple devices, but if it’s anything like playing on a PC, compressed format surround options like those I mention above may not be available. Movies/TV shows shouldn’t be a problem.

I hope this helps.

"Common sense is the collection of prejudices acquired by age eighteen." - Albert Einstein
Contributor I
July 26, 2023

Thanks for the reply @Corry P 

Sorry but my question is around a Mac Studio (a Mac computer just like a Mac mini or a Macbook) and not an Apple TV. The reason I asked is because for the Mac to be able to send DTS/DD it needs to detect the multichannel support on the optical device connected to it on MacOS Audio MIDI and not stereo like this.


 I'm trying to make sure the converter used by Sonos report the correct number of speakers (5.1) to MacOS so it can output DD/DTS before I put this new order.

Can you confirm with your team this info please?

Otherwise it won't work with 5.1and will send only stereo. I think the same applies to regular Windows PCs.

So again, in order for this to work properly Sonos adapter must be able to report 5.1, not 2.0 as in both Windows and MacOS screenshots above.

Can you confirm that info please?

Thanks!

Enthusiast II
July 26, 2023

This is not how optical works. There is no communication between the source and sink, the Sonos device cannot communicate with your Mac. This is a feature only used by HDMI. The Mac might detect it by checking if an optical cable is connected or there might be some advanced settings somewhere. 

Corry P
Sonos Staff
July 26, 2023

Hi @Gutemberg Ribeiro 

Apologies for mixing up Apple TV and Mac Studio (typing “Apple TV” is just habit at this point), but it doesn’t really change my earlier answer.

What @Outburst said is spot on; SPDIF/TOSLink is one-way communication only. 

My suspicion is that, just like with Windows, your Mac Studio is only willing to output surround sound if the interface does not require compression, i.e. MultiChannel LPCM 5.1 or 7.1 via HDMI. When it comes to the optical connection you are using, any surround format must be pre-prepared (compressed), which effectively means that it is only available with recorded media playback and the Passthrough option on the playback software (not in system settings) must be activated. Creative Labs make a USB soundcard that will compress Dolby Digital in real-time using a hardware encoder (Dolby Digital Live, they call the feature), but it is not compatible with macOS, unfortunately. There may be alternate options available for your Mac Studio, however, including software-only ones.

Just in case you are now thinking of connecting your Beam to your Mac Studio directly with an HDMI cable, that will not work - the Beam must be connected to an HDMI-ARC socket, not an HDMI one. If you do connect via a TV, it will need to be one with eARC support to handle uncompressed MultiChannel LPCM. Whether or not your Mac Studio will be willing to then output surround sound at the system level, I’ll leave for someone who has actually tried it to answer.

I hope this helps.

"Common sense is the collection of prejudices acquired by age eighteen." - Albert Einstein
Contributor I
July 27, 2023

Thank you both for the replies. Now I understand what is wrong.

In regards to the HDMI @Corry P I understand HDMI and (e)ARC are two different types of signals/protocols and computers (Mac or Windows) are not doing (e)ARC over their HDMI ports.

I could add a HDFury Arcana to get the eARC signal generated for the Sonos devices but that has a weird downside of even that I'm only sending Audio, MacOS (and Windows for that matter) will detect the HDFury Arcana as a display so you can easily "lose" the mouse cursor if you happen to move the mouse on that "non-existent" screen, which is quite annoying. 

Sound Blaster X4 apparently have 7.1/5.1 discrete channels using the SPIDF optical output but I guess this is uncompressed as you mentioned, and the Dolby Digital Live encoding is not available on MacOS:


So I guess the only option left is to use the HDFury Arcana and live with the phantom display 😢

If I pick that path, do we have any audio delays using the eARC (assuming ofc the HDFury Arcana doesn't introduce any delays)? Also, assuming the apps can play Atmos (like Apple TV+, Netflix, etc), will it work as expected, right?

Anyway, thank you very much for the replies!