
Contributor I
April 8, 2018

Sonos Play 1, trying to find parts to repair

  • April 8, 2018
  • 27 replies
  • 25739 views
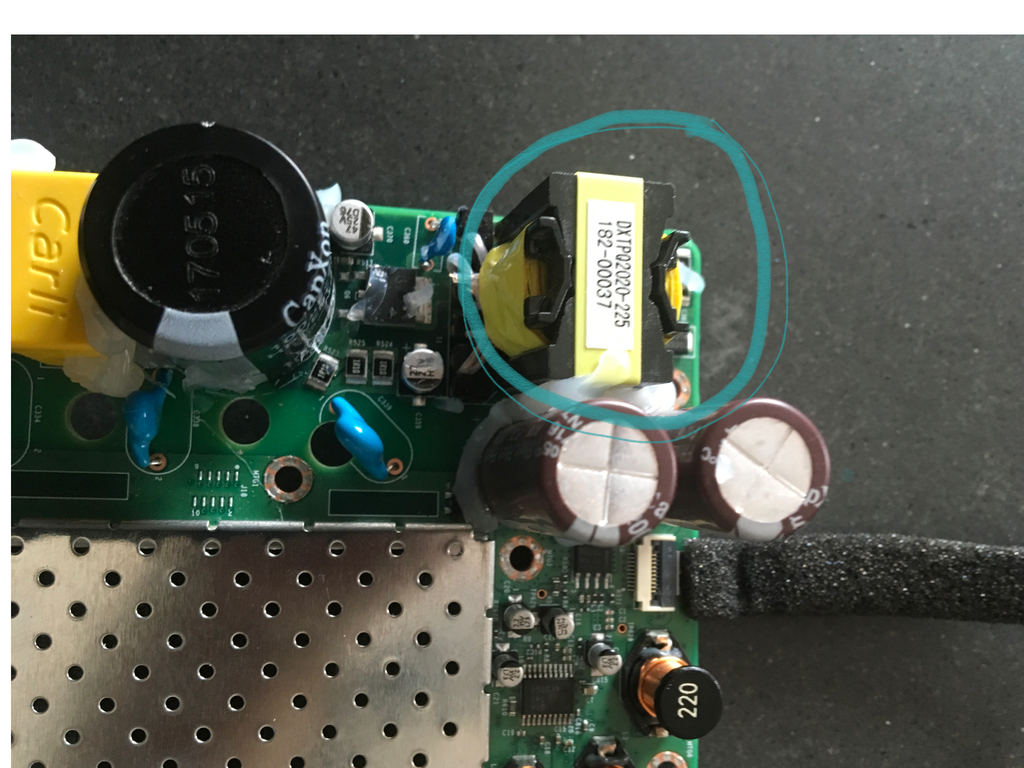
Hello, last week Ive found my Sonos 1 without any light, so I started to troubleshoot and the yellow part in the picture is damaged, plastic and wires are cuts.
DXTPQ2020-225, didnt find any parts info for replacement, any idea ?
Thanks
    This topic has been closed for further comments. You can use the search bar to find a similar topic, or create a new one by clicking Create Topic at the top of the page.

    27 replies

    October 24, 2019

    hi, thanks for the info on play 1 pcb, do you know what type of diode  D302 is as it seems also to have gone short,

    any help appreciated

    stuart

    Lyricist I
    November 4, 2019

    Disclaimer:
    Please be advised that Sonos will not honour any claims (both in-warranty and out-of-warranty), for devices that are tampered with. Opening your device(s) will void any eligibility for replacement of your device(s), for claims both free of charge and those for a fee.


    please be advised Sonos is unwilling to consider repairing parts that knowingly fail, such as the motherboards. While it can be fixed for a few bucks, the BEST Sonos will do is ask you to send back the speaker and give you a 30% discount on the same product, WHICH MAY OR MAY NOT BE a refurbished product. This is a great business model for Sonos, and completely unfair for the consumer, hence the bad reputation that is starting to swell within the Sonos community. I can rely on Sonos for building a good interface and speaker, but can’t think of a poorer customer service experience. My speaker could be repaired for a few dollars, yet their best offer is a replacement for 30% off the original price. It’s silly. 

    Lyricist I
    January 16, 2020

    I know this is an old thread, but it was a great source of information when troubleshooting and fixing a Play 1, so I just want to add my solution for anyone else who ends up here.

    Disclaimer:  I bought this unit very cheap knowing that it didn’t power up and it’s well outside of its warranty.  Opening your unit will invalidate your warranty if you still have one and Sonos won’t help you with it in anyway thereafter.  Open and fix at your own risk.

    I believe my Play 1 had the same failure as OP’s.  The transformer appears to have failed.  From testing I think one primary winding is shorted and the other is open.  It also appears that when it failed it took the Bridge Rectifier with it, as well as who knows how many other components.  After swapping several components out for new ones and going through multiple 2A fuses (the red on board cylinder ones) I conceded that the transformer was the root cause but that it was near-impossible to find the correct replacement.  As @SwATisO  notes, the serial numbers on the transformer do not correlate to anything that is commercially available and after several hours of searching Mouser and similar websites I could not find anything of a similar size with the same number of pins and same primary/secondary voltages and windings.  (Out of interest, are those people posting to say their primary voltage at the Transformer is 155V working on 110v American/European systems?  I’m in the UK using 240v, and the voltage at the transformer primary is nearer 300v as one would expect.)

    I opted for a similar course of action to @timc995 (thanks for your post), but rather than attempt to contain the solution within the device I was happy to go with a simpler external power supply.  I purchased for about £8 off of Amazon a 24V DC 2A universal laptop power supply.  Scavenged a suitable sized socket to match the power supply plug and fitted this socket where the mounting screw hole is in the back of the case.   This required using a dremel to remove the back of screw hole, then drilling the hole out to the required diameter and finally finishing with a small file to get the hole to the correct shape.


    I tried to cover the heat sink adhesive with plastic to stop metal dust sticking, but this failed.  Managed to scrape most of it off.  I should have just peeled it off and stuck back on after.

    Connected leads from the socket to the 35v rated storage capacitors.  Ignore the large mess of wires connected to the bridge rectifier on the right of the image.  This was part of my earlier testing and was removed after this photo.


    I initially secured the socket in place with lots of hot glue as per Sonos’ own construction protocols (seriously, the hot glue guy in their factory either needs a pay rise or some therapy).  This didn’t hold very well and so I replaced it with a whole lot of two part epoxy resin.

    Re-assembled the device and the new power socket is very nicely disguised.


    Applied power and all works well again.. for now until the next cheap component fails.


    Lyricist I
    February 2, 2020

    So I have a soort of power problem I think…… The know blinking white light problem. But in my case…. The led is very light flashing. it seems that the Play 1 does not get enough power and therefore does not start. A factory reset also fails. So thats why I tink its a power problem? 
     

    Is this possible? What do you think! 

    AEW
    Contributor I
    May 9, 2020

    I have two blown components on the motherboard. I can't see any other blown components on my board.
    Anyone knows what the components are?

    Best regards
    Patrick
     

    6f0f8ae4-c5bc-4820-8b31-10c2835e7668.jpg

    21ed1f38-67c3-4084-8e27-0e34aa3985e9.jpg

    Hi! I have exactly the same components blown in one of my play:1 too. Did you manage to fix it somehow?


    Lyricist I
    November 11, 2020

    Hello, my play 1 is suddenly not connected and the LED is not on. So I opened it. The internal power supply is working, the voltage at the capacitor after the secondary coil is 24V. So it seems ok? There is no part with any damage on the board. I tried an other attempt, I took my power supply and put 24V at the same place were are the capacitor is standing. There is a very small current, but still no function? Is the wireless lan modul also working with 24V? If not may be there is any voltage regulator alter the 24V and there is the problem? 

    Does anyone have any idea what could I do to fix the system?


    Thanks and best regards!

    Lyricist I
    January 5, 2021

    Hello everyone and happy new year! I was experimenting with my play ome, trying to power it directly from a dc power supply for use in the bathroom where I don’t want to have 230v ac. So I opened it up and connected the 24v dc power supply to one of the capacitors ( blue circle in the attached photo) and it worked fine. After I modified to be able to attach the cable from the power supply, I most likely attached the dc cable with reverse polarity and now nothing works even when connected to 230v ac via the original cable. I tried measuring with a multimeter and I get the results as shown in the photo.  Basically I start with 230v then after the bridge it climbs to 730v and after the transformer nothing. Nothing is visibly blown or burnt.  Any help would be greatly appreciated, thank you!