

As many of you may have realised, sound bars like the sonos beam aren’t really tailored for use on PCs - they’re made to be used on TVs or Media players that have HDMI ARC connectors. They definitely work on PCs, but to use them to their full potential, you need to make some extra configurations and invest a little bit more money and time.
It’s been 2 months since I bought my Sonos Beam and I’ve spend many hours diving into the audiophile and surround sound rabbit hole, learning about the technicalities of sound and scouring audiophile forums to figure out how to make the speakers work at their optimal on a PC. I’m ganna share what I’ve found out so others don’t end up wasting a huge amount of time trying to configure the speakers.
First of all, your PC will likely have HDMI ports for outputting videos and audio, but those ports are unlikely to be HDMI ARC ports - which you need to plug the Beam into for it to receive audio (you can get some hardware that adds ARC ports I think, but the ones I found online seem to only output stereo audio). Thankfully, the beam comes with an HDMI ARC to S/PDIF (AKA - TOSLINK or Digital audio cable) adaptor, which you can plug into a cheap PC DAC (or your motherboard if it has an optical out port). A lot of people seem to suggest that you either to buy a soundcard (yes, one of those ancient redundant artefacts) like the one in this video or buying an expensive DAC like this, but it seems like any DAC with an Optical Out Input will suffice if you want stereo sound (thought some DACs may give you better sound quality and drivers - but not by a whole lot). I initially connected my Beam to my Fiio K3 DAC (which only outputs stereo sound), but since I wanted my beam to output Dolby Digital 5.1 surround sound (which it’s capable of outputting), I bought this cheap 5.1 surround sound DAC (CMedia CM6206LX). I recommend you buy it if the £400 price tag of the Beam has already drained your wallet, but still left you wanting surround sound. The drivers for the DAC comes in a CD (another relic of the past) and is hard to find online, but I managed to find it after some googling.
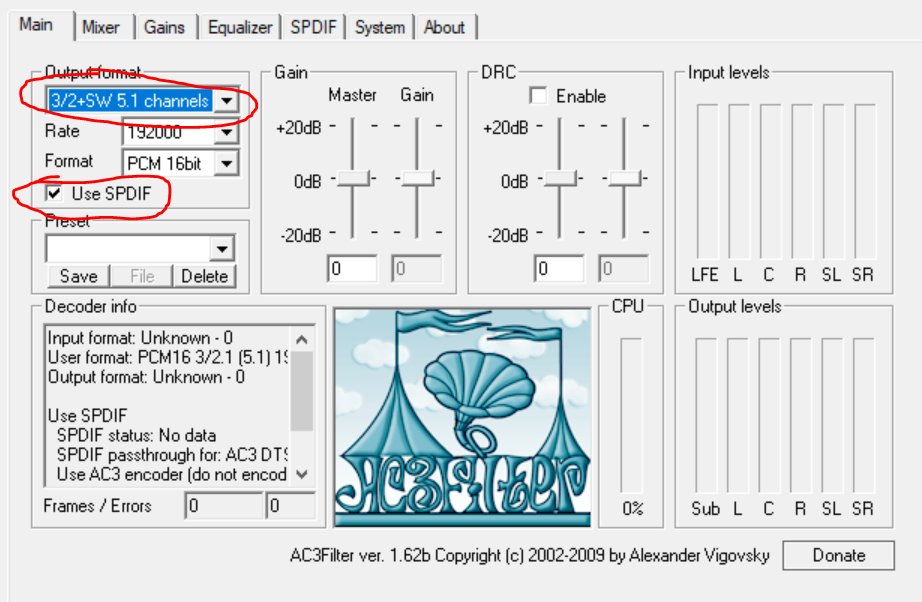
Plug the Beam into the HDMI ARC to S/PDIF adaptor, then plug the adapter in the the optical out port of the DAC (not the optical IN) and plug the DAC into a USB port in the PC. Once the DAC’s drivers are installed, make sure to open the windows start menu, search for “change system sounds”, open the application, navigate to the the “Playback” tab, double click on the “USB Multi-Channel Audio Device” playback device that doesn’t have the speaker icon, navigate to the “Supported Formats” tab and select “Dolby Digital”.
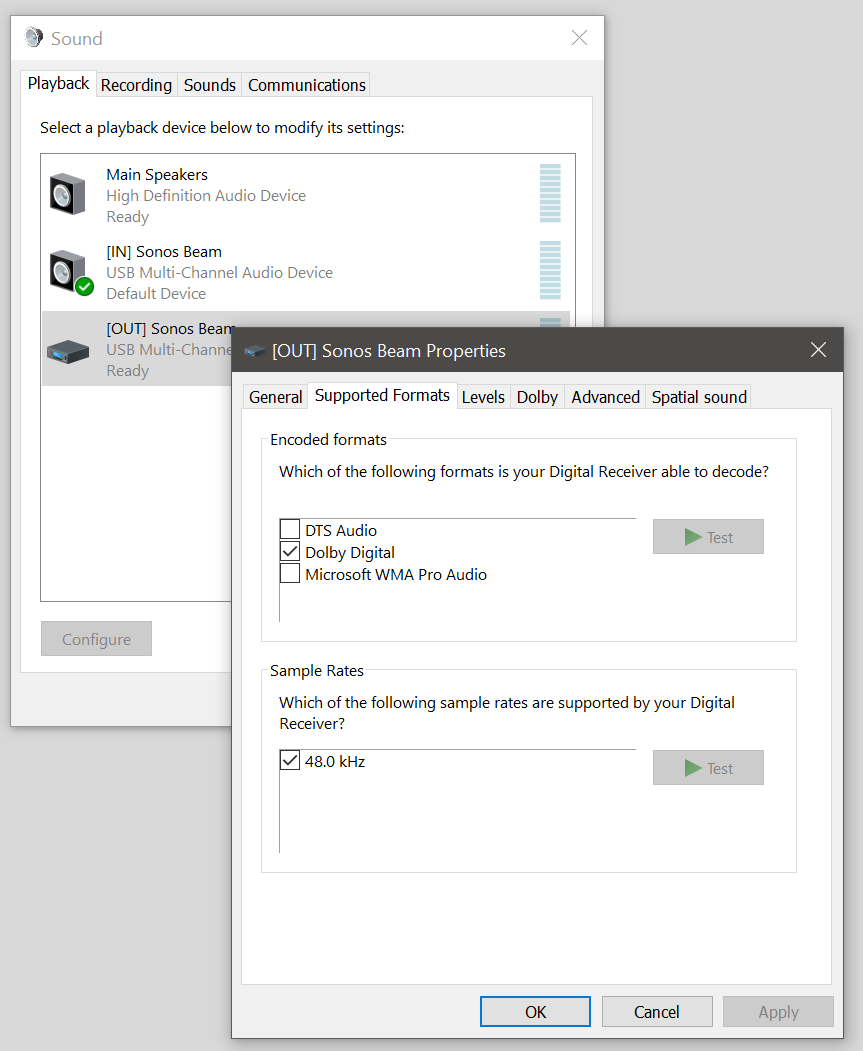
(Note: Ignore the “Dolby” Tab, you won’t see that unless you do something that I’ll get into later).
Note that the DAC splits your beam into 2 playback devices (the ones with the speaker icon, which I’ll call [in], and the one with the transmitter icon, which I’ll call [out] - I recommend renaming them while editing the sound setting above). The [in] input applies effects configured in the DAC’s driver to the sound before it’s outputted. The [out] input does not apply the affects, but note that both do not apply the effects when DD5.1 audio is being decoded and outputted to the speaker. The effects only seem to be applied when the audio is stereo.
With the drivers for the DAC installed, you’ll see an icon in you icon tray that looks like this:

It’s the configurator for the DAC. Open it and select the option to output audio to 6 channels (the Beam’s 6 speakers) so it knows to output 5.1 audio when presented with it.
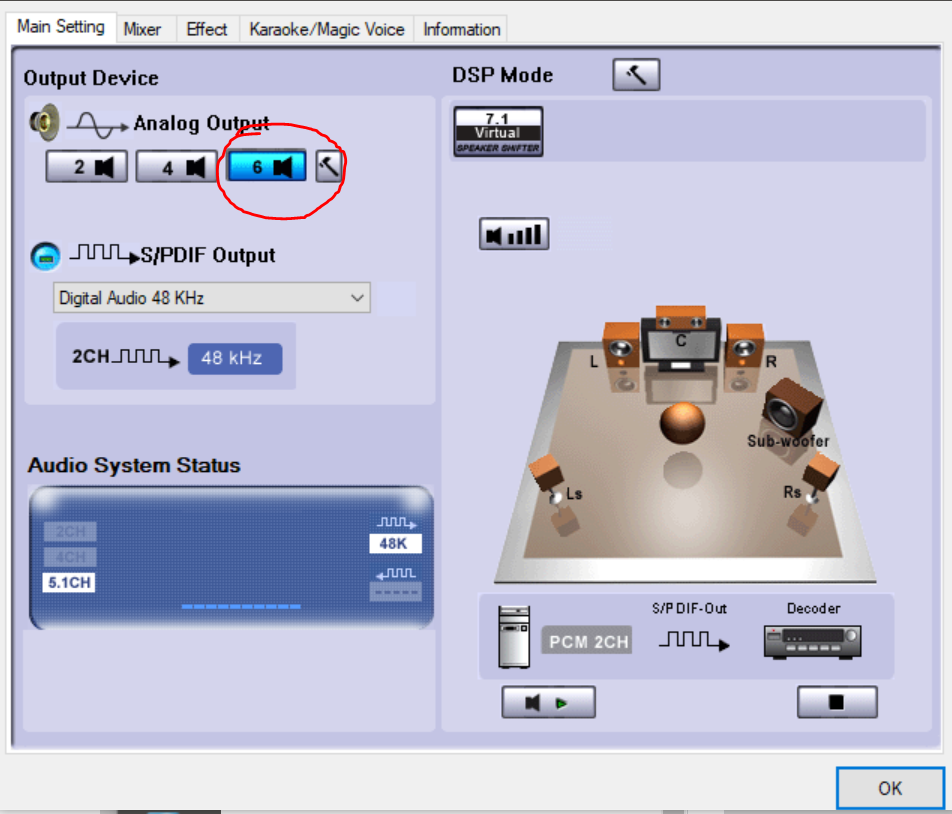
There are also some EQ controls you can mess about with, but they’re very basic and they only apply to the [in] input as mentioned before. The EQ controls on this as basic so I don’t use them.
To play DD5.1 media, I’d recommend using MPC-HC as media player and using either AC3Filter or LAV audio to decode the DD5.1 (AC3) audio and pass it onto the speaker. Without those decoders, you’ll only get Stereo PCM sound from your speaker, not 5.1 surround sound. To install MPC-HC and the aforementioned decoders, download and install the k-lite codec mega pack. It comes packaged with the stuff you need. You can customise the installation to install the AC3Filter decoder instead of the LAV audio decoder (I’ll get into why you might want to install one over the other later), but the LAV decoder is a lot more stable and less fiddly, so I’d stick to that instead. This video is really useful for setting up MPC-HC for playing surround sound, but I’ll provide a brief overview of the process.
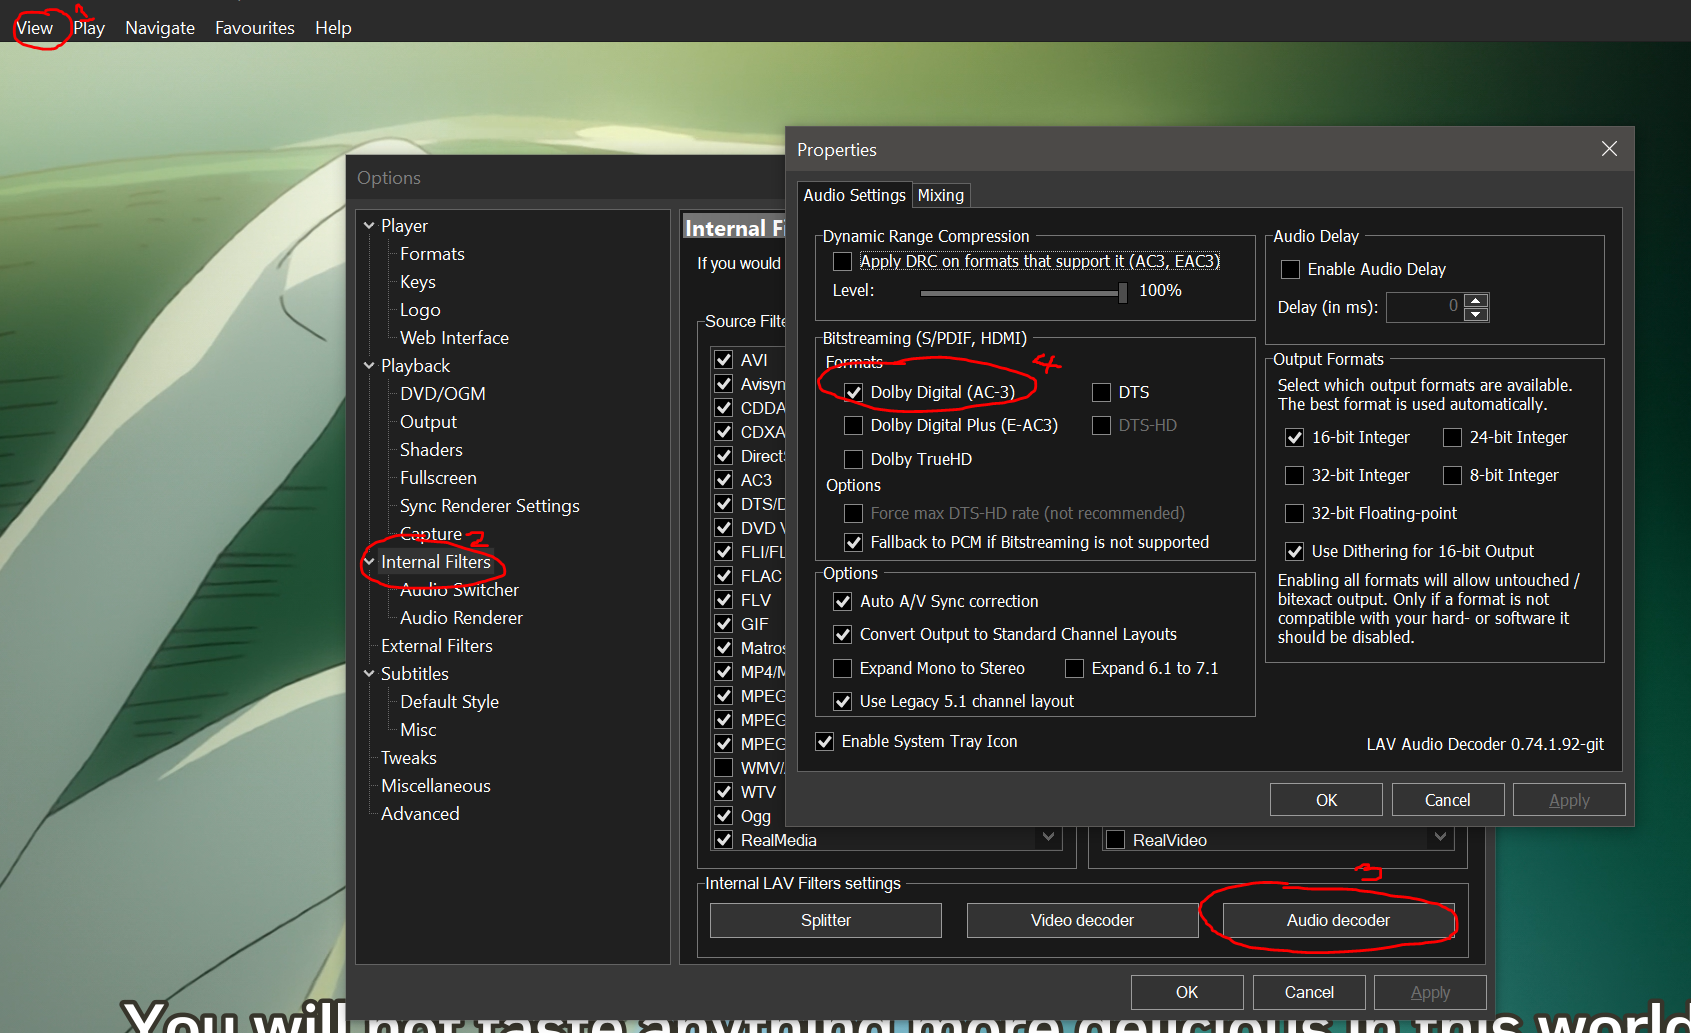
From what I read online, S/PDIF can only transmit Stereo PCM audio or compressed 5.1. For it to output AC3 (Dolby digital 5.1) audio, you need to enable bitstreaming (which allows you to transmit high bandwidth audio like 5.1 surround sound over certain low bandwidth connections like S/PDIF) on MPC-HC. To do this, you need to navigate to “view > options”, select the “internal filters” selection and click on the “Audio decoder” button, then select “Dolby Digital AC-3” under the “Bitstreaming (S/PDIF, HDMI)” section, apply and then click OK. This will make your videos with AC3 audio (5.1 Dolby surround sound audio) output DD5.1 audio to yours speakers.
Note that you can not control the sound levels of your speakers from your PC while bitstreaming DD5.1 audio, so you’re ganna have to use the PC app or the Phone app to control the sound. Also any EQ settings you may have applied to the speakers will be ignored while DD5.1 is playing and you can’t edit the EQ with the LAV decoder (you can with the AC3Filter decoder though). I’d recommend just edit the treble and bass in the Sonos app if you wanna play with the EQ.
You can check if DD5.1 audio is actually being outputted by going to the Sonos phone app, navigating to “Settings > System > About My System”, scroll to the bottom of the page and looking at the “Audio In” statistic. If it’s playing Stereo sound, it’ll say “Stereo PCM 2.0” after a few second of detection (you need to leave the About My System section and come back to it to see the refreshed results/statistics every time you change audio) and “Dolby Digital 5.1” while playing AC3 audio.
Now, there’s a problem. A lot of your favourite films might have surround sound encoded as “DTS” audio. The Beam only supports Dolby Digital 5.1. There are 2 solutions for this. You can either transcode the audio in real time (Convert it from DTS to DD5.1 - which the Xbox One S and some TVs and Blu-ray Players do if you enable the option to do it) using the aforementioned “AC3Filter” decoder (which you can install on MPC-HC with the K-lite installer while doing a custom install) or you can use a tool called “MeGUI” to convert the audio/video audio in question from the DTS format to the AC3 format (make sure to disable the option that also re-encodes the video or it’ll change the video quality). I’m using the latter method since AC3Filter is kinda unstable, fiddly and a pain to configure. But AC3Filter offers a lot of cool options for modifying how your surround audio sounds and lets you make certain channels louder than others and lets you EQ too. Just remember to configure it to use S/PDIF and to output to 5.1 channels.
On both LAV and AC3Filter you can downmix 7.1 surround sound to 5.1 surround (I.E. You can play 7.1 surround sound as 5.1 surround sound by combining or obscuring some of the audio to make it 5.1), but I’m not going to get into that because I haven’t tested it that much.
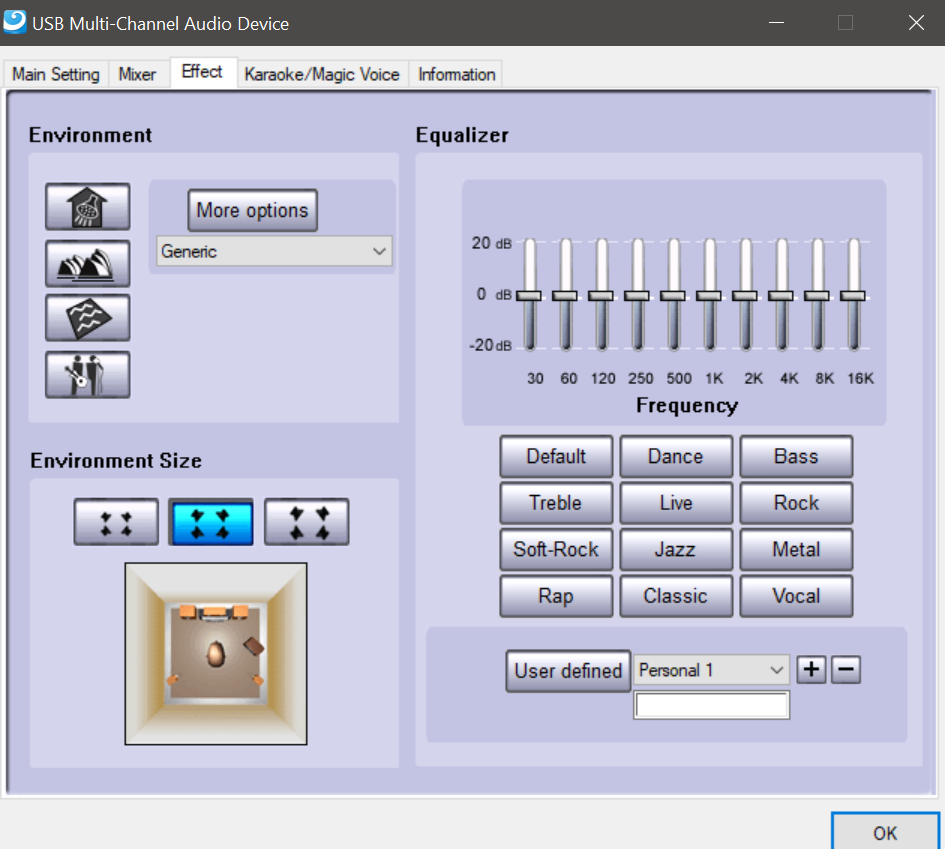
Out of the box, the Sonos Beam is too bassy and boomy - to the point is drowns out vocals and makes them too deep. It can sound really muddy without modifying it’s EQ, but the EQ options in the app are very lacking for a fiddler like me. The EQ tool that the DAC drivers provide are somewhat lacking too. So instead of using those, I use “PC Equalizer”, where I’ve created several sound profile for the beam and my other speakers. This is the configuration I use for watching videos on the internet:
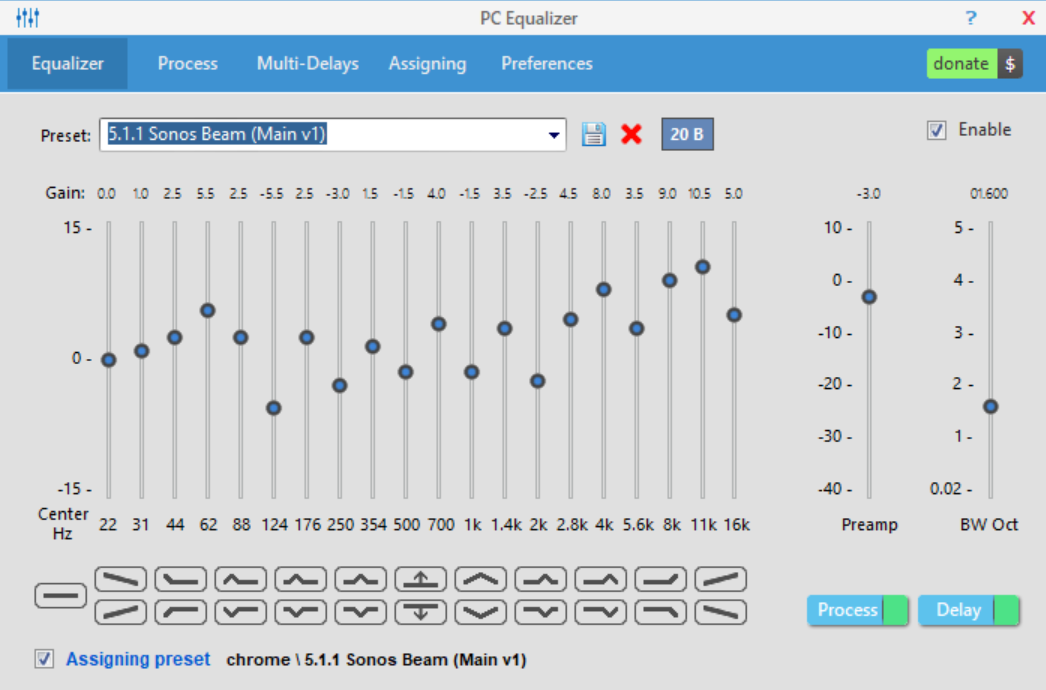
This is where the DAC splitting the Speaker into 2 Audio output comes in handy. You can configure one of the outputs to be affected by the Equalizer and the other not to be (ideally, you shouldn’t configure [Out] input to be affected by it - this is for good reason, I’ll explain later).
To configure the EQ of the speakers with this program, got to the “Preferences Tab” and click on the “Equalizer APO configurator” button.
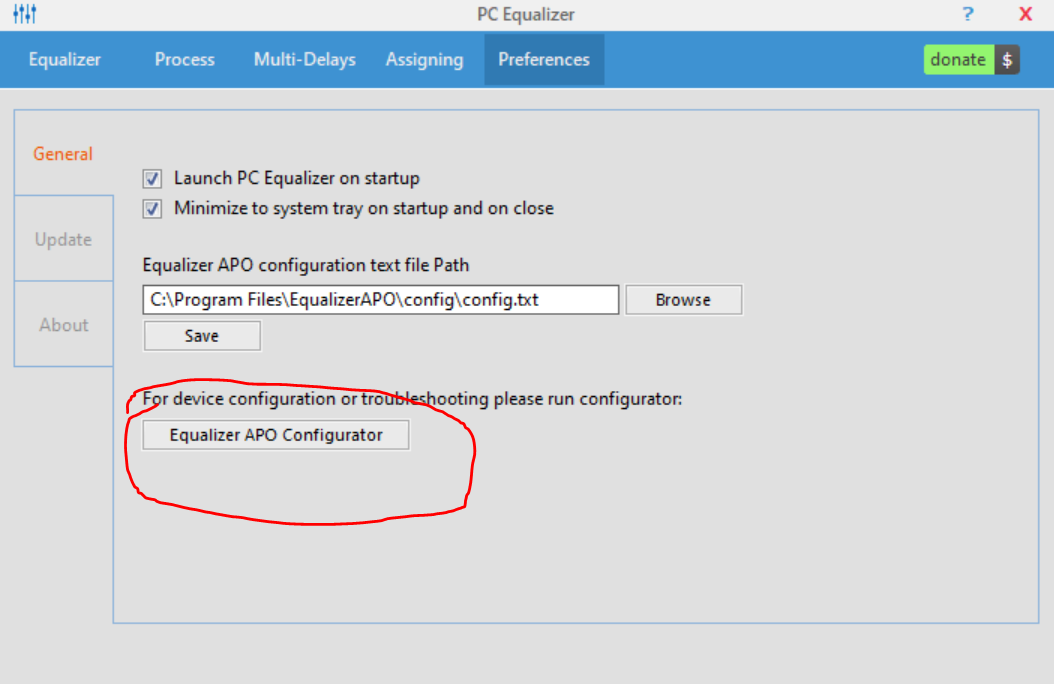
Then select the [in] input, click OK and restart your PC.
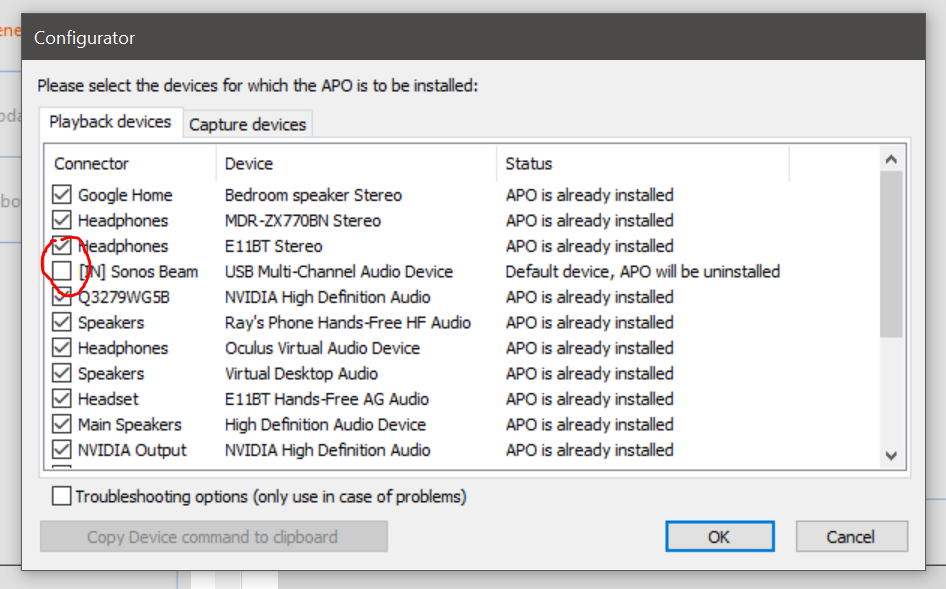
Note that this will only edit the audio of the stereo sound you’ll hear from the [in] input while listening to stereo audio, the EQ is not applied while playing DD5.1 audio.
The configuration above will reduce the bass, make the speakers sound less muddy and will make the treble extra loud. I recommend disabling TruePlay and Increasing the Bass between 3 and 5 on the Sonos App to adjust how loud you want the bass with my configuration.
On the topic of “TruePlay”, many of you android users might not know this, but there’s a feature on the beam that lets you configure the sound of your speaker (on the app) based on your room and where the placement of the speaker in relation to wear you listen to it. This feature is only on the iPhone app because it configures the speakers using the specific microphone set of microphones that each Iphone in the Iphone line up uses. All microphones detect, process and record audio differently and produce different sounding recordings. Android OS is use a multitude of phone with many different types of microphones with many different placement, but Apple’s line up is much smaller so it’s easier to program such a feature just for apple phones. But the good news is that you can borrow a friend’s Iphone and configure the feature using their phone and then you’ll be able to enable and disable it from you andriod phone once the set up is done. I have a One Plus 7T and I used my sister’s Iphone 7 to configure the feature and I can now disable and enable it on my One Plus 7T (the option didn’t show on my phone before I configured it on my sister’s phone). The improvement that “TruePlay” offers varies. For me, with my EQ settings disable, it was somewhat noticeable, but I found that my EQ settings did a better job at de-mudding the sound and that with it on, I couldn’t notice a difference with “TruePlay” on or off. But everyone’s hearing and affinities to certain frequencies of sound differs, so your millage my vary.
While playing a few 5.1 surround sound capable games (like the Witcher 3), you might notice that you you only get stereo audio. To fix this, I recommend following the steps in this video if you have a Nvidia GPU (if you got an AMD GPU watch this one) and configuring the [out] input to take Dolby Digital as it’s default format. The [in] input can not be used for this (it throws and error when you select Dolby Digital as it’s default format) and the PC Equalizer program can not work in tandem with the configurations you’ll make after following the steps in this video (hence why I recommended not to configure the [out] input to allow the equalizer to work on it). This is cause the [out] speakers to continuously output DD5.1 audio - it will even upmix stereo audio to DD5.1 (it will play some of the stereo sound in the other speakers and treat it like surround sound). The UpMixing of the stereo audio may not sound that great to you, so you can always swap to the [in] input. Once you follow the steps in the tutorial, you can use the Dobly Digital Plus tool to do some EQ on the DD5.1 audio, but it’s got a really bad graphical interface, so don’t expect too much if you want a manual EQ. There are a few present though.
Please note that I’m not entirely sure if it’s just upmixing stereo sound to DD5.1 all the time, including scenarios where I’m playing AC3/DD5.1 audio from MPC-HC without bitstreaming (if you keep bitstreaming enabled/don’t undo the bitstreaming option selections I showed before, you will definitely get DD5.1 audio that hasn’t been mixed). Technically, you shouldn’t be able to get uncompressed DD5.1 from an S/PDIF connection (at least according to what I read on the internet) so it seems like it might be upmixing stereo to 5.1 all the time instead of bitstreaming DD5.1, but my knowledge on this topic is limited.
Just a few side notes:
- This post probably has a few things missing and a few typos, I’ll fix them when I re-read it later (took me a while to type to up and I’m kinda tired XD)
- The google assistant on the Beam sucks. It can’t answers many questions that a regular google home or android phone can answer verbally and it often doesn’t understand what I’m saying, despite being able to hear my say “OK Google” from the other room in a quiet voice. Either just use Alexa or disable it and use your phone/invest in a google home mini.
- Configure the speaker in the android home app if you wanna do cool stuff like broadcasting your voice to the speaker or asking your phone to play music to it from another room.
- Limit the sound of the beam, it is so bloody loud at 100%, I limited the maximum sound to 50%. If you’re using google assistant or Alexa, the assistance will talk in the max 50% sound, so you might want to limit it a bit more if they’re super loud.
- If you want some DD5.1 audio samples, you can find a few here.
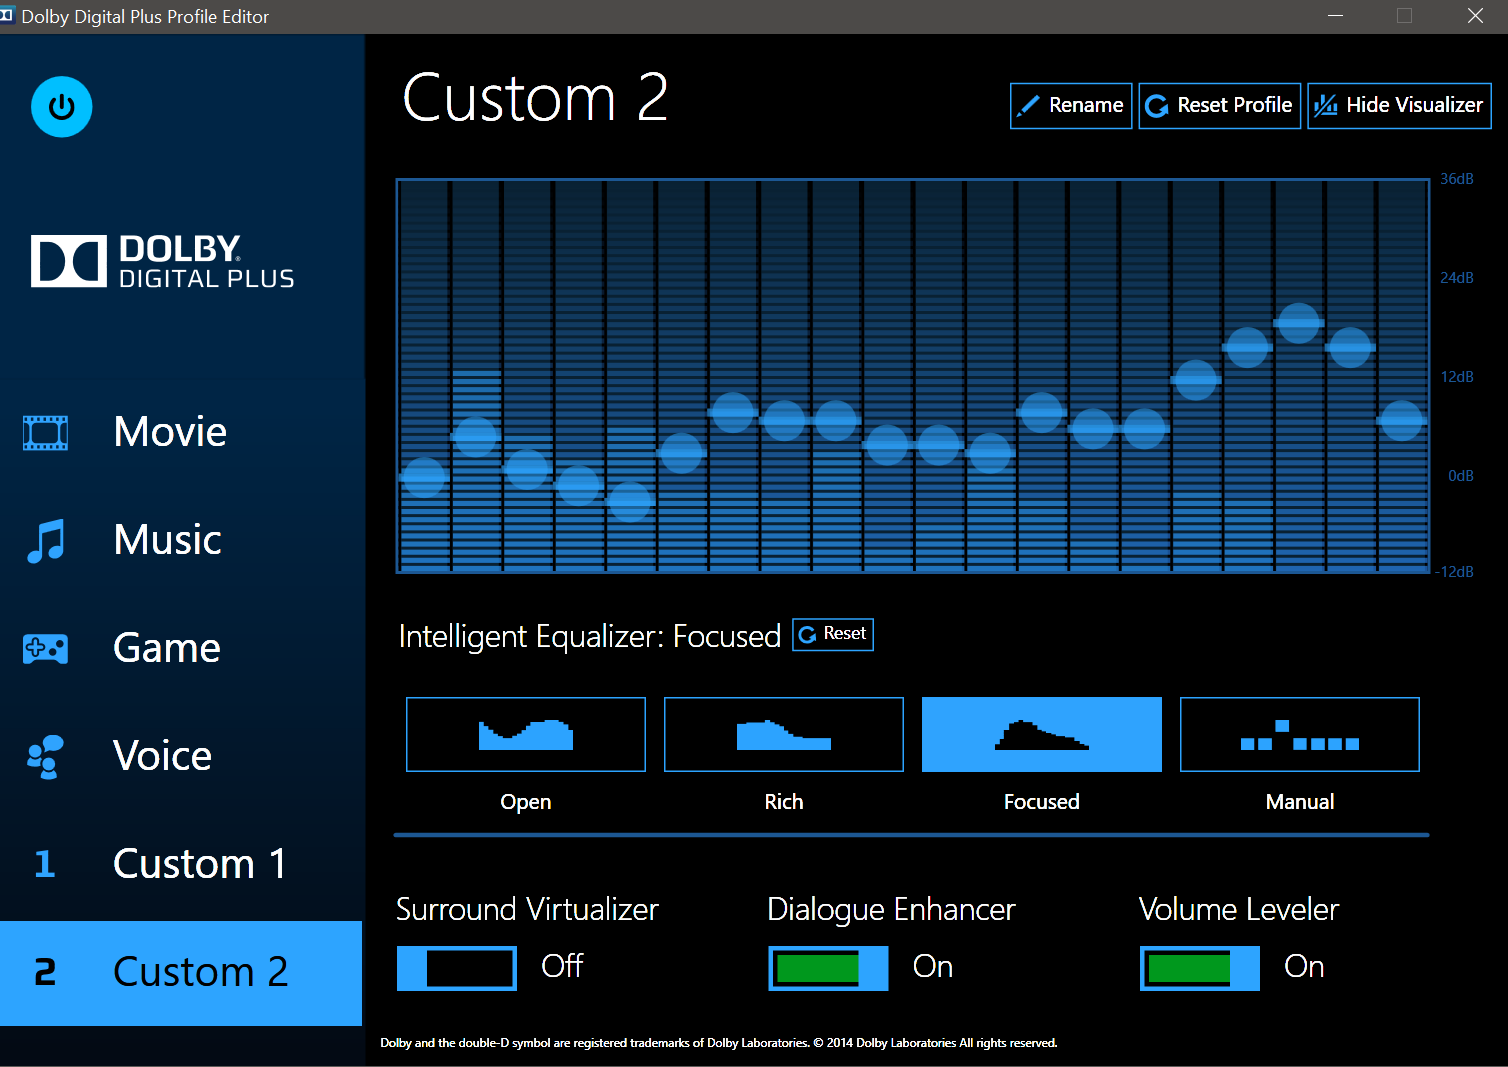
- The loudness equaliser (the “loudness” option in the Sonos app) is kinda bad/really weak. I would recommend spending some money on Dolby Access App on the windows store to get a better loudness equalizer (which is called “volume leveler” in the application) to use on the [in] input. The app is great for headphones too, it pretty makes your headphones into Dolby atoms headphones/improves the sound, so it’s worth investing money into. (If you dunno wtf loudness equalization is - this video explains it well imo)
- I bought a TOSLINK to 3.5mm adaptor to see if I could plug the beam into a 3.5mm jack, but it didn’t work, so don’t make the same dumb mistake as me XD
- I also bought a 3.5mm to TOSLINK adaptor white trying to see if I could make my old speakers and the Beam play in sync, by plugging them into the same DAC, but that was a dud too and a pretty stupid strategy XD
- You can use Voiceoometer to play 2 audio sources at the same time and adjust their delay so you don’t get an echo from the output delay, but the delay fluctuate, so don’t bother trying this if you’re not willing to adjust the delay every time you boot up your PC.
- Some DACs might not let you control the volume of the Beam in Windows, so beware.
As a present for making it all the way through, here’s a chance to play a game of “SPOT THE BEAM!”
(Yup, I’m a weeb, but I’m also self aware and not exclussively obsessed with anime - I like drawing and learning about computer stuff too XD)